
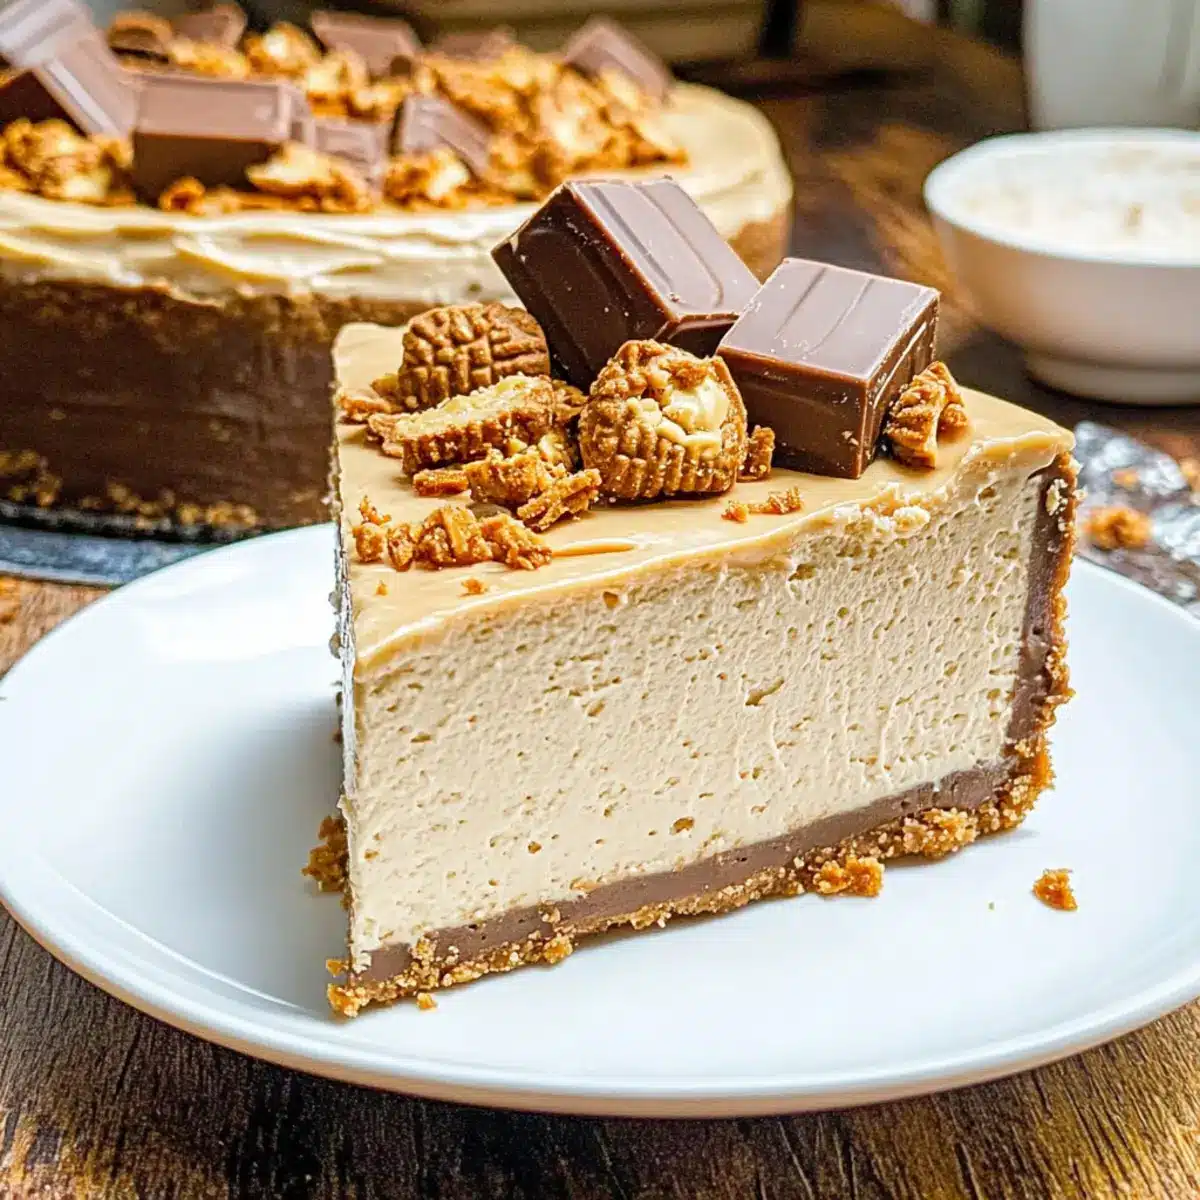
As I stood in my kitchen, the sweet aroma of peanut butter wafted through the air, instantly transporting me back to my childhood. I could hardly resist diving into my latest creation: a Nutter Butter Cheesecake that’s as delicious as it looks. This dessert features a crunchy Nutter Butter crust paired with a creamy filling that oozes rich flavor while being surprisingly easy to prepare. Perfect for gatherings or cozy nights in, this no-bake cheesecake is a crowd-pleaser that promises to delight peanut butter enthusiasts. Plus, it can be made ahead of time, leaving you free to enjoy precious moments with loved ones. Are you ready to indulge? Let’s get started on this irresistible treat!

Why is This Cheesecake a Must-Try?
Irresistible Flavor: This Nutter Butter Cheesecake delivers a decadent combination of peanut butter and creamy filling that will leave your taste buds dancing.
No-Bake Convenience: With its simple prep process, you can craft this stellar dessert without activating the oven, which makes it a great choice on warm days.
Versatile Variations: Feeling adventurous? Swap ingredients with crushed Oreos or almond butter for a fresh twist—endless options await!
Perfect for All Occasions: Whether it’s a holiday gathering or a casual family dinner, this cheesecake absolutely steals the show and sparks joy among friends and family.
Make Ahead Ease: Preparing it a day in advance means less stress on party day, just like my Garlic Butter Shrimp recipes!
Visual Delight: With its gorgeous layers and appealing toppings, this cheesecake is a true showstopper that adds pizzazz to any dessert table.
Nutter Butter Cheesecake Ingredients
For the Crust
• Cooking Spray – Prevents sticking; use any non-stick spray as a suitable alternative.
• Nutter Butter Cookies (18) – Forms the crunchy base; can substitute with any similar cream-filled cookies.
• Heath Bars (2.8 oz) – Adds a caramel and chocolate flavor; can replace with toffee bits if unavailable.
• Melted Butter (6 Tbsp) – Binds the crust together; ensure it’s cooled slightly before mixing to avoid melting the cookie crust.
• Pinch of Kosher Salt – Enhances sweetness; use regular table salt if needed.
For the Cheesecake Filling
• Cream Cheese (3 blocks, 8 oz each, softened) – Provides structure and creaminess; avoid low-fat versions for best texture.
• Creamy Peanut Butter (3/4 cup) – The star flavor of this Nutter Butter Cheesecake; natural peanut butter can be used, though it may alter creaminess.
• Granulated Sugar (3/4 cup) – Sweetens the filling; adjust according to your taste preference.
• Large Eggs (3) – Provides structure; ensure they are at room temperature for better mixing.
• Sour Cream (1/4 cup) – Adds creaminess and tang; substitute with Greek yogurt for a lighter option.
• Pure Vanilla Extract (1 tsp) – Enhances flavor; use the best quality available as there are no suitable substitutes.
• Kosher Salt (1/2 tsp) – Balances flavors in the filling; regular salt can be used if necessary.
For the Topping
• Additional Sour Cream, Granulated Sugar, Pure Vanilla Extract, Creamy Peanut Butter, and Heavy Cream – Used to enhance topping texture and flavor.
• Mini Nutter Butter Cookies (8 or 4 crushed) – For decoration; optional, other cookies can be used.
• Chopped Heath Bars (2.8 oz total) – Garnish; use dark chocolate shavings if desired for extra flair.
Step‑by‑Step Instructions for Nutter Butter Cheesecake
Step 1: Preheat the Oven
Start by preheating your oven to 325°F (163°C). This initial step is crucial for ensuring that your Nutter Butter Cheesecake bakes evenly. While the oven heats, gather your ingredients and equipment, including a springform pan, mixing bowls, and a hand mixer.
Step 2: Prepare the Crust
In a medium bowl, combine the crushed Nutter Butter cookies, melted butter, and a pinch of kosher salt. Mix until the crumbs are evenly coated. Press this mixture firmly into the bottom of your greased springform pan, creating a solid crust layer. Ensure it’s level and compact for a sturdy base.
Step 3: Make the Filling
In a large mixing bowl, beat the softened cream cheese until smooth and creamy. Gradually add in the peanut butter and granulated sugar, mixing on medium speed until well combined. This creates the luscious base for your Nutter Butter Cheesecake. Scrape down the sides of the bowl to ensure an even mixture.
Step 4: Incorporate the Eggs
Add the eggs one at a time, mixing well after each addition. This step is vital for achieving the perfect texture. Next, blend in the sour cream and pure vanilla extract until the filling is smooth and creamy. Your cheesecake mixture should be velvety at this point, ready to pour over the crust.
Step 5: Bake the Cheesecake
Pour the cheesecake filling over the prepared crust, smoothing the top with a spatula. Place the pan in the preheated oven and bake for about 1 hour. The cheesecake should look set around the edges but still have a slight jiggle in the center, indicating it’s perfectly baked.
Step 6: Cool the Cheesecake
Once baked, turn off the oven and crack open the oven door, allowing the cheesecake to cool gradually for 15 minutes. This gentle cooling helps prevent cracks. Afterward, remove the cheesecake from the oven, and let it cool to room temperature before refrigerating it for at least 2 hours, or until completely chilled.
Step 7: Prepare the Topping
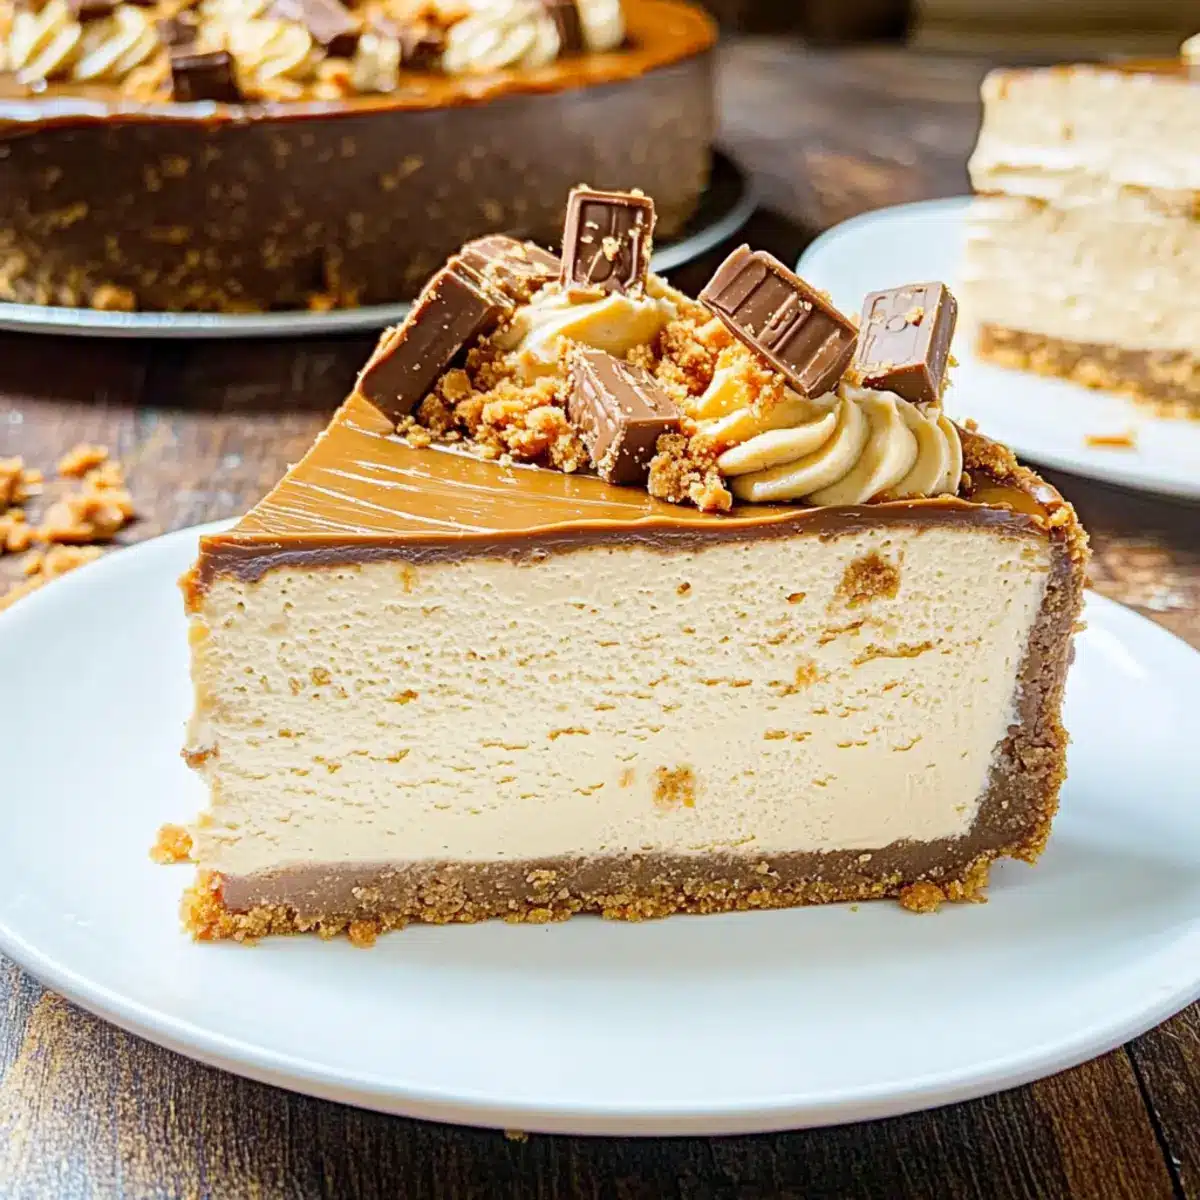
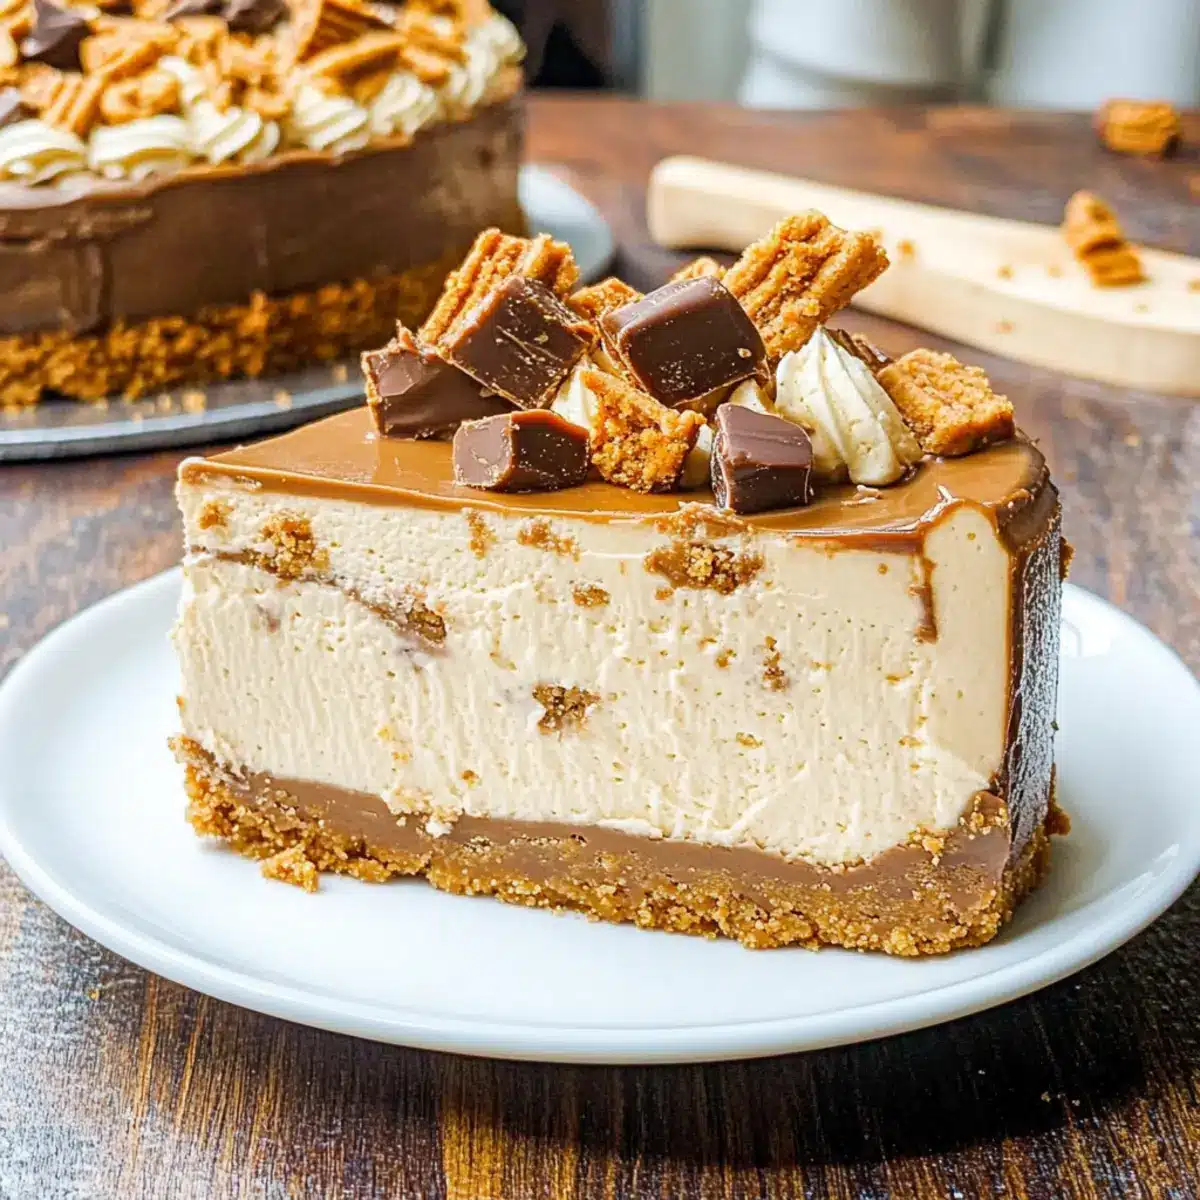
In a clean bowl, combine the extra sour cream, granulated sugar, vanilla extract, creamy peanut butter, and heavy cream. Mix until smooth and fluffy, creating a delightful topping for your Nutter Butter Cheesecake. Taste and adjust the sweetness if needed for your preference.
Step 8: Assemble and Garnish
Spread the creamy topping evenly over the cooled cheesecake, making sure to cover the entire surface. For a fun touch, garnish with mini Nutter Butter cookies and chopped Heath Bars, pressing them gently into the topping. This adds a crunchy, sweet finish to your spectacular dessert.
Step 9: Final Chill
Return the assembled cheesecake to the refrigerator for at least another hour before serving. This extra chilling time ensures that the layers meld beautifully and the cheesecake firms up. When ready, slice and savor every rich bite of your heavenly Nutter Butter Cheesecake!
Make Ahead Options
These Nutter Butter Cheesecakes are a fantastic choice for meal prep, ensuring you spend less time in the kitchen on the day of your gathering. You can prepare the crust and filling up to 24 hours in advance—just store them separately in the refrigerator. When ready to serve, bake the cheesecake as directed and let it cool completely before adding the topping. For optimal quality, keep the topping ingredients mixed but separate until you’re just about to assemble the cheesecake; this prevents any separation. Just spread the fluffy topping over the chilled cheesecake, garnish with mini Nutter Butter cookies, and you’ll have a delightful dessert ready to impress with minimal effort!
Storage Tips for Nutter Butter Cheesecake
- Room Temperature: It’s best to keep your Nutter Butter Cheesecake refrigerated to maintain flavor and texture. Do not leave it at room temperature for more than 2 hours.
- Fridge: Store leftovers in an airtight container in the refrigerator for up to 5 days. This helps preserve the creamy texture of the cheesecake while keeping it fresh.
- Freezer: If you need to store the cheesecake for longer, wrap it tightly in plastic wrap and then in aluminum foil. It can be frozen for up to 3 months; just thaw overnight in the fridge before serving.
- Reheating: This dessert is best enjoyed cold, so skip the reheating. If desired, you can let it sit at room temperature for about 15 minutes before serving for an extra creamy texture.
Nutter Butter Cheesecake Variations
Feel free to explore these delightful variations to cater to your palate and dietary preferences!
- Dairy-Free: Use coconut cream in place of cream cheese and plant-based butter for a creamy base without the dairy.
- Gluten-Free: Substitute Nutter Butter cookies with gluten-free Oreos or any gluten-free cookie to maintain that delightful crunch.
- Sugar-Free: Opt for sugar alternatives like monk fruit or stevia to sweeten the filling while cutting back on sugar.
- Flavor Booster: Add a tablespoon of espresso powder to the filling for a delightful coffee twist that complements the chocolate.
- Chocolate Lovers: Drizzle melted chocolate ganache over the topping for an indulgent chocolate layer that adds elegance and flavor.
- Nutty Crunch: Fold in chopped nuts like pecans or walnuts into the creamy topping for added texture and a nutty flavor that enhances the cheesecake.
- Spicy Kick: Mix in a dash of cayenne pepper or chili powder into the peanut butter layer for an unexpected heat that perfects the sweet-and-spicy balance!
- Swirled Delight: Create a marble effect by swirling melted chocolate or fruit puree into the cheesecake filling before baking to add a fun visual and additional flavor.
And speaking of variations, if you want more ideas, you might enjoy my Baked Lemon Butter Chicken or explore the sweet side with a Caramel Apple Cheesecake. Each recipe offers unique twists to suit your cravings!
What to Serve with Decadent Nutter Butter Cheesecake
When it comes to enjoying a slice of creamy delight, the perfect accompaniments can make your Nutter Butter Cheesecake experience even more special.
-
Fresh Berries: The pop of tartness from fresh strawberries or raspberries cuts through the richness of the cheesecake, providing a vibrant contrast.
-
Chocolate Sauce: Drizzling warm chocolate sauce adds another layer of indulgence, harmonizing beautifully with the dessert’s peanut butter flavor.
-
Whipped Cream: Light, fluffy whipped cream offers a delightful creaminess that complements the cheesecake’s texture and boosts the sweetness.
-
Coffee: A rich, brewed coffee serves as an earthy counterpoint to the dessert, enhancing its flavors and providing a warm, comforting sip.
-
Milkshake: A peanut butter or vanilla milkshake creates a deliciously creamy pairing, perfect for peanut butter lovers craving that ultimate indulgence alongside their cheesecake.
-
Ice Cream: Vanilla or chocolate ice cream adds a cold, creamy element that melts into the warm cake, creating a decadent sensation in each bite.
-
Miniature Nutter Butter Cookies: Serve these on the side for a nostalgic crunch that echoes the cheesecake’s crust, making each bite truly unforgettable.
-
Toffee Bits: Sprinkling extra toffee bits not only adds a sweet crunch but also complements the Heath Bar garnish, enhancing the overall flavor profile of your dessert.
By thoughtfully considering these pairings, you’ll create a memorable dessert experience that will leave your guests raving!
Expert Tips for Nutter Butter Cheesecake
- Room Temperature Ingredients: Ensure all dairy ingredients, especially cream cheese, are at room temperature. This helps create a smoother filling without lumps.
- Avoid Cracking: After baking, let the cheesecake cool in the oven with the door ajar for 15 minutes. This gradual temperature change prevents cracks from forming.
- Perfecting the Topping: Adjust the sweetness of your creamy topping by tasting as you mix. This allows you to tailor the flavor of your Nutter Butter Cheesecake to your liking.
- Chill Thoroughly: Refrigerate the cheesecake for at least 2 hours after baking and again after adding the topping. This ensures the perfect texture and flavor development.
- Press Firmly: When making the crust, press the Nutter Butter mixture firmly into the springform pan to create a solid base that holds its shape when sliced.
Nutter Butter Cheesecake Recipe FAQs
How do I choose the right Nutter Butter cookies for the crust?
Absolutely! When selecting Nutter Butter cookies, look for ones that are fresh and free of dark spots or cracks, indicating they’re past their prime. I recommend checking the expiration date and opting for a crisp texture to ensure the crust holds up well.
What’s the best way to store a Nutter Butter Cheesecake?
You can store your Nutter Butter Cheesecake in an airtight container in the refrigerator for up to 5 days. Make sure it’s well-covered to prevent any dryness or absorption of odors from other foods. If you need to make it ahead, keep it in the fridge until serving day.
Can I freeze Nutter Butter Cheesecake?
Yes, you absolutely can! To freeze your cheesecake, first wrap it tightly in plastic wrap, followed by aluminum foil. This method protects it from freezer burn. You can store it for up to 3 months. When you’re ready to enjoy it, thaw it overnight in the fridge for the best texture.
What should I do if my cheesecake cracks while baking?
Very! If your cheesecake cracks, don’t worry; it still tastes amazing! To help prevent this, let the cheesecake cool in the oven with the door ajar for about 15 minutes after baking, which allows gradual cooling. If cracks do happen, you can always cover them with the creamy peanut butter topping for a delicious and attractive fix.
Is this Nutter Butter Cheesecake safe for those with allergies?
Make sure to check all labels for potential allergens, especially if you’re making it for someone with dietary restrictions. This recipe contains common allergens like dairy and eggs. As for pets, keep this cheesecake away from dogs due to the chocolate in Heath Bars, which can be toxic to them.
How do I make sure my eggs are at room temperature?
To bring your eggs to room temperature quickly, place them in a bowl of warm water for about 10-15 minutes. This is an essential step for better incorporation in the cheesecake mixture, giving you that creamy texture everyone loves in a Nutter Butter Cheesecake!
Creamy Nutter Butter Cheesecake That'll Wow Your Guests
Ingredients
Equipment
Method
- Start by preheating your oven to 325°F (163°C). Gather your ingredients and equipment, including a springform pan, mixing bowls, and a hand mixer.
- In a medium bowl, combine the crushed Nutter Butter cookies, melted butter, and a pinch of kosher salt. Mix until the crumbs are evenly coated. Press the mixture firmly into the bottom of your greased springform pan, creating a solid crust layer.
- In a large mixing bowl, beat the softened cream cheese until smooth and creamy. Gradually add in the peanut butter and granulated sugar, mixing on medium speed until well combined.
- Add the eggs one at a time, mixing well after each addition. Blend in the sour cream and pure vanilla extract until the filling is smooth and creamy.
- Pour the cheesecake filling over the prepared crust, smoothing the top with a spatula. Place the pan in the preheated oven and bake for about 1 hour.
- Once baked, turn off the oven and crack open the oven door, allowing the cheesecake to cool gradually for 15 minutes. Let it cool to room temperature before refrigerating it for at least 2 hours.
- In a clean bowl, combine the extra sour cream, granulated sugar, vanilla extract, creamy peanut butter, and heavy cream. Mix until smooth and fluffy.
- Spread the creamy topping evenly over the cooled cheesecake, garnish with mini Nutter Butter cookies and chopped Heath Bars.
- Return the assembled cheesecake to the refrigerator for at least another hour before serving.
Leave a Reply