
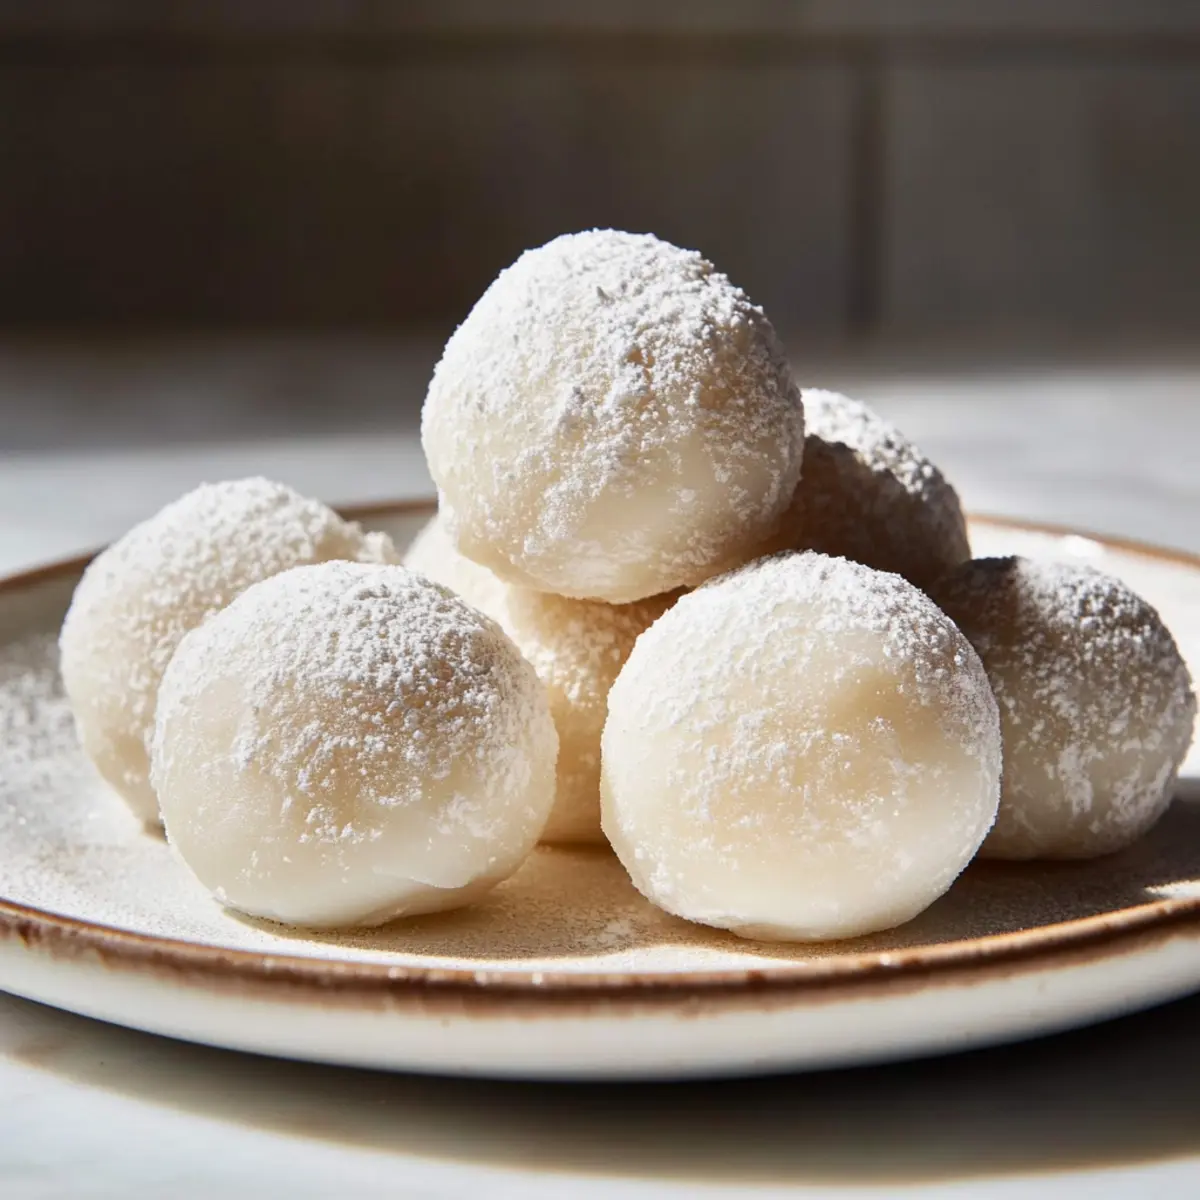
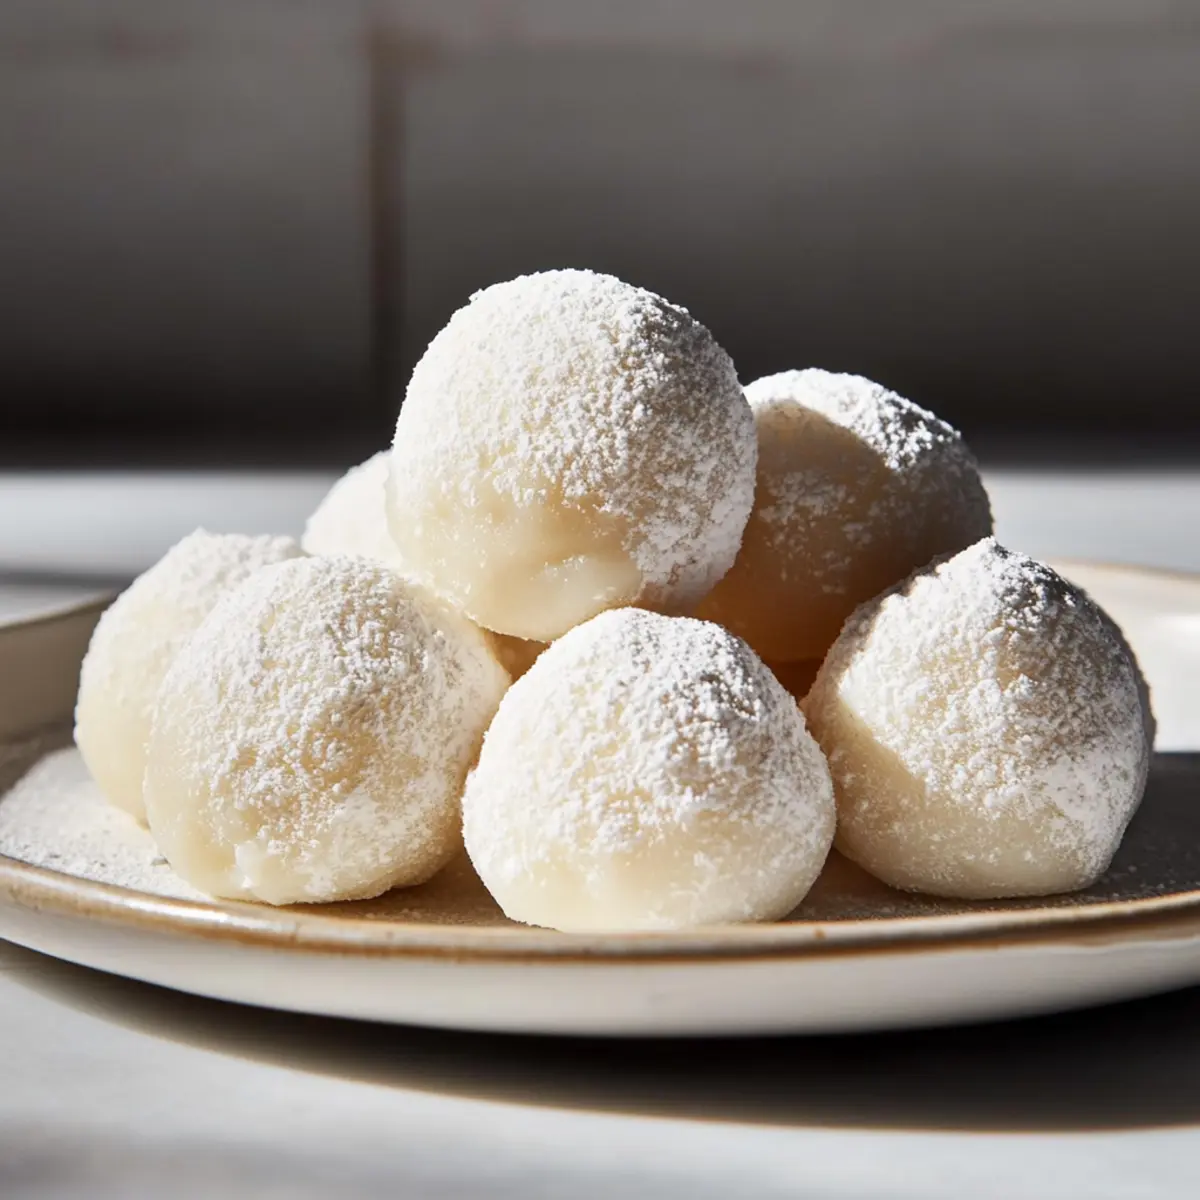
Can you believe that in just 30 minutes, you can create a delightful Japanese treat that feels like a soft pillow in your mouth? This milk mochi recipe is my latest obsession, blending traditional techniques with modern convenience to offer a quick and scrumptious dessert. Perfect for gatherings or cozy nights in, these chewy treats are incredibly fun to make and even more enjoyable to share. The irresistible benefits are twofold: they require minimal ingredients and are deliciously versatile—enjoy them plain or dress them up with sweet toppings. Are you ready to dive into the world of homemade milk mochi and experience the joy of crafting your own chewy delights? Let’s get started!
Why is Milk Mochi a Must-Try?
Deliciously Chewy: The unique texture of milk mochi is soft, chewy, and simply addictive, making it a standout dessert that everyone will love.
Quick Preparation: With just 30 minutes of your time, you can whip up these delightful treats—perfect for those who prefer homemade over fast food.
Versatile Treat: Whether enjoyed plain or dressed up with sweetened condensed milk or powdered sugar, these mochi can easily adapt to your personal taste.
Impressive Presentation: Serve them alongside a cup of green tea or coffee for an elegant touch that will impress your guests, just like my White Chicken Chili does at dinner parties!
Simple Ingredients: You won’t need an elaborate ingredient list; just pantry staples are sufficient for this tasty treat, keeping it accessible for everyone.
Get ready to indulge in the delightful world of homemade milk mochi—it’s a fun culinary adventure you won’t want to miss!
Milk Mochi Recipe Ingredients
For the Mochi
• Glutinous Rice Flour – Provides that signature chewy texture; also known as sweet rice flour.
• Whole Milk – Adds a creamy flavor; room temperature milk blends smoother than cold.
• Granulated Sugar – Adjust the sweetness to your liking with this essential ingredient.
• Cornstarch – Softens the texture of the mochi, ensuring that melt-in-your-mouth experience.
• Water – Helps achieve the right batter consistency for the mochi.
• Salt – Enhances overall flavor, bringing all the ingredients together.
For Coating
• Potato Starch or Cornstarch – Perfect for dusting to prevent sticking and keep the mochi’s surface smooth.
Optional Topping
• Sweetened Condensed Milk – Drizzle for an extra rich and indulgent finish, elevating your milk mochi experience.
This milk mochi recipe is simplicity at its finest, allowing your creative spirit to shine while you craft these delightful treats!
Step‑by‑Step Instructions for Milk Mochi Recipe
Step 1: Combine Dry Ingredients
In a microwave-safe bowl, whisk together 1 cup of glutinous rice flour, ¼ cup of granulated sugar, 2 tablespoons of cornstarch, and a pinch of salt until well mixed. This step sets the foundation for your milk mochi, ensuring a uniform sweetness and texture.
Step 2: Add Wet Ingredients
Gradually stir in ¾ cup of whole milk and 2 tablespoons of water into the dry mixture. Aim for a smooth, lump-free batter; you can use a regular fork or whisk for this process. The batter should be creamy and fluid, so adjust the water if necessary to achieve the right consistency.
Step 3: Microwave the Mixture
Cover the bowl with vented plastic wrap and microwave the batter for 1 minute on high. After the first minute, carefully remove the wrap (watch out for steam), stir the mixture, and then microwave for two additional 1-minute intervals. The mochi should transform into a translucent, stretchy mixture; this indicates it’s nearly ready.
Step 4: Cool the Dough
Once the milk mochi mixture reaches the desired consistency, allow it to cool for 2-3 minutes at room temperature. The dough is extremely hot at this point, so handle with care. Letting it rest will also help improve the texture, making it easier to work with.
Step 5: Dust the Work Surface
Sprinkle a generous amount of potato starch or cornstarch on your work surface to prevent sticking. Gently transfer the cooled dough onto the prepared surface. Dust the top of the dough with more starch to safeguard against stickiness, making it simpler to shape your mochi.
Step 6: Shape the Mochi
Divide the dough into 8 to 10 equal pieces using a spatula or your hands. Roll each piece into smooth balls, being mindful to dust your hands with cornstarch to prevent adherence. As you work, the simple, chewy texture of the milk mochi starts to take shape, sparking excitement for the final results.
Step 7: Allow to Set
Place the formed mochi balls on a tray or plate and allow them to cool for about 15 minutes. During this time, the mochi will firm up slightly, making them easier to handle. Before serving, dust off any excess starch for a clean finish.
Step 8: Add Finishing Touches
Before enjoying your delicious milk mochi, consider drizzling with sweetened condensed milk or dusting with powdered sugar for an extra touch of sweetness. Each option adds a layer of indulgence to the chewy treats, elevating your homemade milk mochi experience.

What to Serve with Homemade Milk Mochi?
Elevate your experience with delightful complementary dishes that create a full meal around these chewy Japanese treats.
- Green Tea: A soothing cup of this delicate beverage enhances the sweet flavors of mochi, making each bite feel more refined.
- Fresh Fruit Salad: Light and refreshing, a medley of fruits balances the richness of milk mochi, adding brightness to your dessert table.
- Sweetened Condensed Milk Drizzle: An optional touch that not only amplifies sweetness but also adds a luscious creaminess, making it irresistible.
- Matcha Ice Cream: The earthy flavor of matcha ice cream provides a beautiful contrast, making it a delightful pairing that excites the taste buds.
- Japanese Mochi Ice Cream: For an adventurous twist, serve your milk mochi alongside these frozen delights for a playful texture variation.
- Chilled Coffee: A lightly sweetened iced coffee can provide a wonderful caffeine kick, complementing the sweetness of the mochi and refreshing the palate.
- Sesame Seed Cookies: Crunchy and nutty, these cookies add a delightful textural contrast that balances the chewiness of mochi while introducing new flavors.
- Mochi Toppings Bar: Encourage creative flair with assorted toppings—consider coconut flakes, crushed nuts, or flavored syrups for a fun edible art experience.
- Chilled Sake: This traditional Japanese drink, enjoyed cold, pairs nicely with the sweet treats, offering a unique flavor pairing that delights the senses.
Make Ahead Options
Preparing your milk mochi ahead of time is a fantastic way to save time and ensure that a delicious treat is ready when you need it! You can make the mochi mixture and store it in the refrigerator for up to 24 hours. To do this, simply follow the cooking instructions up to the cooling step, then allow the mixture to cool before sealing it in an airtight container. When ready to enjoy, pop it in the microwave for about 1 minute to soften, then dust with cornstarch, shape into balls, and cool for 15 minutes before adding your desired toppings. This way, you’ll have scrumptious milk mochi at your fingertips, just as delightful as when freshly made!
Expert Tips for Milk Mochi Recipe
-
Resting Time Matters: Allow the dough to rest for 2-3 minutes after microwaving to ensure the perfect chewy texture.
-
Smooth Batter: Mix your ingredients well to avoid lumps in the batter, resulting in a better milk mochi experience.
-
Watch the Heat: Be cautious when handling hot dough; use silicone gloves or a cloth to prevent burns.
-
Starch is Key: Dust your hands and work surface with cornstarch to prevent sticking, making it easier to shape the mochi.
-
Upgrade Your Mochi: Get creative with flavors or fillings like fruit purees to add diversity to your milk mochi recipe!
-
Storage Tips: Keep your finished mochi in an airtight container at room temperature for up to 3 days to maintain freshness.
How to Store and Freeze Milk Mochi
Room Temperature: Keep your milk mochi in an airtight container at room temperature for up to 3 days to preserve freshness and chewy texture.
Fridge: If you want to store them longer, place your mochi in the fridge where they can last for up to a week. Be sure to keep them covered to prevent drying out.
Freezer: For future enjoyment, you can freeze milk mochi in a single layer on a baking sheet before transferring them to an airtight container; they’ll stay good for about 1 month.
Reheating: To enjoy after freezing, simply thaw in the fridge overnight or at room temperature for about 30 minutes. For a warm treat, microwave for a few seconds until soft and pliable again.
Milk Mochi Recipe Variations
Feel free to explore these delightful twists on the milk mochi recipe—each option adds a unique flavor or texture that will leave you craving more!
-
Flavor Infusion: Incorporate fruit purees, like strawberry or mango, into the batter for a vibrant taste explosion. Adding fruit not only gives a lovely hue but also a fresh burst of sweetness.
-
Chocolate Lover’s Delight: Mix in cocoa powder or melted chocolate into the dough for a rich dessert option. Imagine the blend of soft, chewy mochi with decadent chocolate—the ultimate treat for chocoholics!
-
Dairy-Free: Swap out whole milk with almond or coconut milk for a plant-based treat. This not only keeps it vegan but also imparts a subtle nutty flavor that complements the chewy mochi brilliantly.
-
Lower Calorie: Use a sugar substitute, like stevia or monk fruit, for a guilt-free version that still satisfies your sweet tooth. It’s a wonderful option if you’re watching your sugar intake while still enjoying your favorite treats.
-
Spiced Up: Add a dash of cinnamon or matcha powder to the batter for an aromatic twist. These additions not only enhance flavor but also serve as beautiful color highlights in your mochi.
-
Texture Twist: Incorporate crushed nuts or mochi ice cream filling for an exciting crunch. This twist will give a playful textural contrast to the soft and chewy mochi, making every bite enjoyable.
-
Sweet Toppings: Instead of just using sweetened condensed milk, try drizzling with caramel or a fruit glaze for an eye-catching presentation. The extra moisture and flavor will elevate your mochi to new heights!
As you create your milk mochi, don’t forget to pair them with a cup of green tea or as a delightful topping for a bowl of shaved ice, similar to what you’d find in my delicious Butter Chicken Pasta recipe! Enjoy experimenting with these variations, as the creativity will make your homemade mochi truly unforgettable!

Milk Mochi Recipe FAQs
How do I pick ripe ingredients for my milk mochi?
Absolutely! For the best results, make sure your whole milk is fresh and at room temperature to promote smooth blending. If you’re opting for sweetened condensed milk, choose a brand that has a rich and creamy consistency. Quality ingredients make all the difference!
How should I store my milk mochi?
Very! Store your milk mochi in an airtight container at room temperature for up to 3 days to maintain their delightful chewiness. If you wish to keep them longer, refrigerate for up to a week, but ensure they are covered to prevent them from drying out.
Can I freeze milk mochi? How?
Yes, definitely! To freeze your milk mochi for later enjoyment, spread them in a single layer on a baking sheet, then freeze until solid. Once set, transfer them into an airtight container or freezer bag. They can be stored in the freezer for about 1 month. When ready to enjoy, allow them to thaw in the fridge overnight or at room temperature for about 30 minutes. For a warm treat, microwave briefly until soft and pliable.
What should I do if my mochi dough is too sticky?
If your dough is too sticky while shaping, don’t worry! Dust your hands and the dough with additional cornstarch or potato starch to reduce the stickiness. Also, let the dough rest for a few minutes longer after microwaving; this helps improve the texture and makes it easier to handle.
Can my pets enjoy milk mochi?
Not really. Since milk mochi contains sugar and can be sticky, it’s best to keep them away from pets. The ingredients might not be harmful in small quantities, but sugary treats are not advisable for animals. Always stick to pet-friendly snacks when it comes to feeding your furry friends!
Are there any allergenic ingredients in the milk mochi recipe?
Great question! This milk mochi recipe is generally safe for those who are vegetarian. However, it does contain gluten from the glutinous rice flour, so it’s not suitable for individuals with gluten allergies or celiac disease. If making for someone with allergies, consider using alternatives like gluten-free flour options specifically designed for mochi!
Soft Chewy Milk Mochi Recipe: Whip Up This Japanese Treat
Ingredients
Equipment
Method
- In a microwave-safe bowl, whisk together glutinous rice flour, granulated sugar, cornstarch, and a pinch of salt until well mixed.
- Gradually stir in whole milk and water into the dry mixture to aim for a smooth, lump-free batter.
- Cover the bowl with vented plastic wrap and microwave the batter for 1 minute on high, stirring and microwaving for two additional 1-minute intervals.
- Allow the mixture to cool for 2-3 minutes at room temperature.
- Sprinkle potato starch or cornstarch on your work surface to prevent sticking, then transfer the cooled dough.
- Divide the dough into 8 to 10 equal pieces and roll each into a smooth ball.
- Place the mochi balls on a tray and allow them to cool for 15 minutes.
- Before serving, drizzle with sweetened condensed milk or dust with powdered sugar.
Leave a Reply