
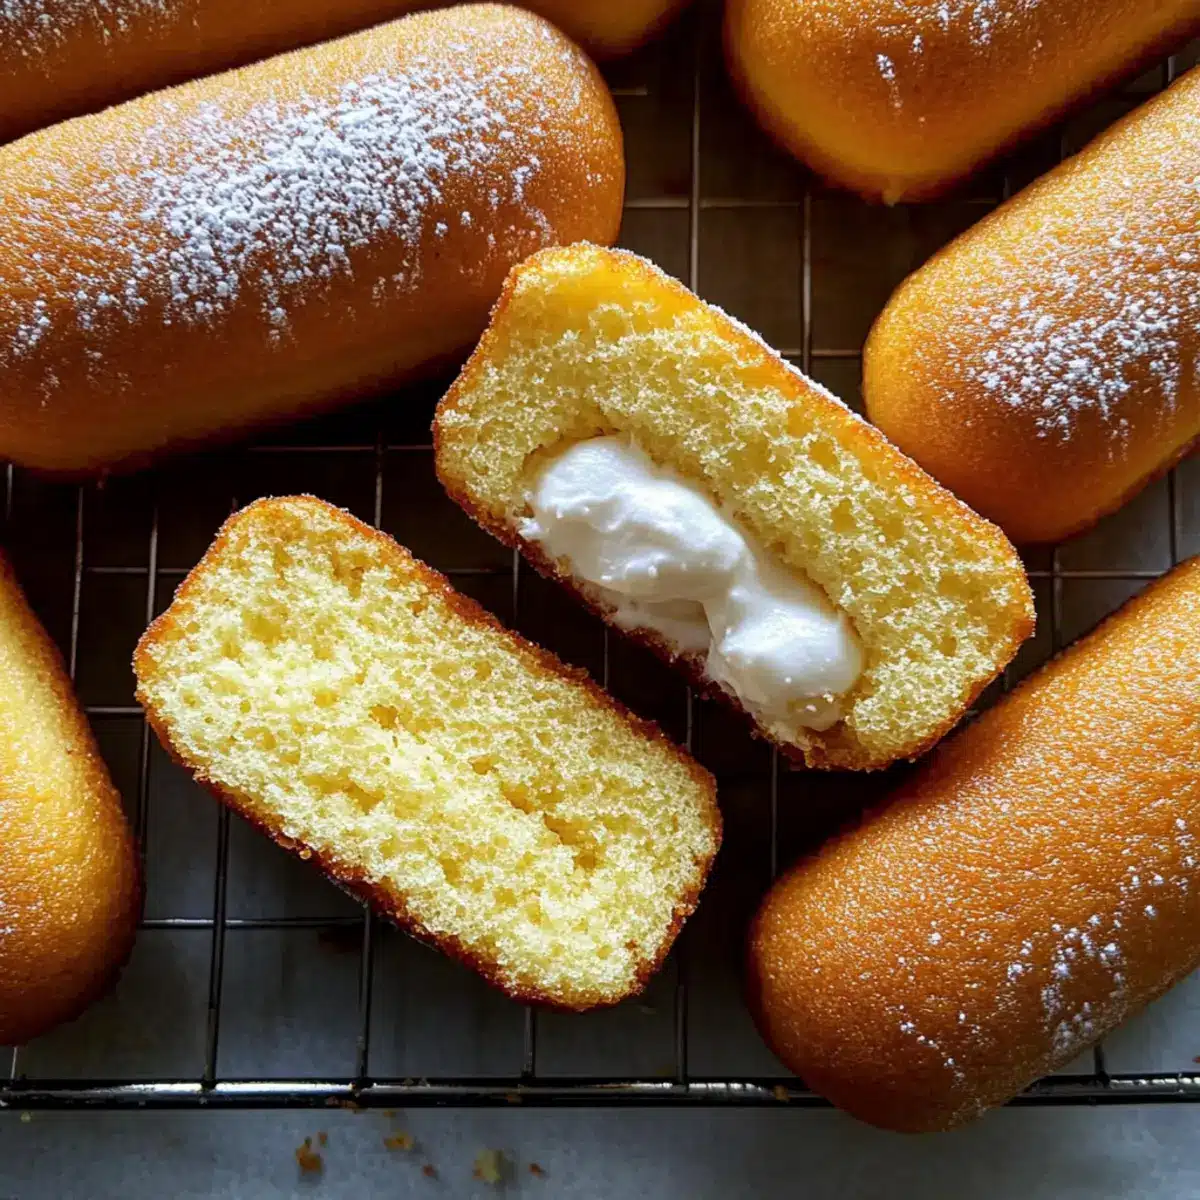
As I stood in my kitchen, the scent of cake batter swirling around like a childhood memory, I realized this was the perfect moment to reinvent a classic sweet. Homemade Twinkies are the ultimate nostalgic treat, featuring a fluffy golden sponge wrapped around a delightful marshmallow crème that glides right back to those carefree days of childhood. What makes these gems extra special is that they’re made from scratch, ensuring no preservatives creep into your delicious bites. Not only are they a fun kitchen adventure, but these homemade delights are also a healthier alternative to the processed store versions, making them perfect for family gatherings or when you need a sweet pick-me-up. Are you ready to dive into the joys of nostalgia with me?
Why make homemade Twinkies?
Nostalgic Flavor: Experience the bliss of childhood with every bite of these tender, golden sponges filled with luscious marshmallow crème.
Wholesome Ingredients: Made from scratch, these treats proudly feature no preservatives, ensuring you’re indulging in quality flavors without guilt.
Fun to Create: Baking these delights is not only a rewarding culinary adventure but also a fantastic way to bond with family and friends.
Endless Customization: Feel free to experiment with various flavors, like chocolate or citrus, and create your own signature filling! Check out our recipe for Homemade Pecan Bread for more delightful baking inspiration.
Perfect for Any Occasion: Whether it’s a birthday party, bake sale, or even a cozy afternoon treat with tea, homemade Twinkies are sure to impress!
Homemade Twinkies Ingredients
For the Sponge Cake
• All-Purpose Flour – Provides structure to the sponge; substitute with gluten-free flour for a gluten-free version.
• Baking Powder – Aids in the rising of the sponge; ensure it’s fresh for best results.
• Salt – Enhances flavor and balances sweetness; use kosher or sea salt.
• Eggs (4 large, room temperature) – Main leavening agent that contributes to texture; room temperature eggs whip to a greater volume.
• Granulated Sugar (2/3 cup) – Sweetens and adds moisture; follow with less or use a sugar substitute if necessary.
• Vanilla Extract (1/2 teaspoon) – Adds flavor depth; consider pure vanilla extract for best taste.
• Milk (2 tablespoons) – Moistens the batter; can be replaced with almond or oat milk for a dairy-free option.
• Unsalted Butter (1 tablespoon, melted) – Enriches moisture and flavor; substitute with coconut oil for a dairy-free option.
For the Filling
• Unsalted Butter (1/2 cup, softened) – Acts as the base for the marshmallow filling; use vegan butter for a dairy-free alternative.
• Marshmallow Creme (1/2 cup) – Main component of the filling, adding sweetness; homemade versions can be substituted if desired.
• Powdered Sugar (1 cup) – Sweetens and thickens the filling; sifted for a smoother texture.
• Vanilla Extract (1 teaspoon) – Enhances flavor; can swap with other extracts for unique flavors.
• Heavy Cream (1 tablespoon) – Adds richness to the filling; use coconut cream for a dairy-free option.
With these wholesome ingredients, you’re one step closer to crafting your own Homemade Twinkies that will delight every palate!
Step‑by‑Step Instructions for Homemade Twinkies
Step 1: Preheat the Oven
Begin by preheating your oven to 350°F (175°C). While the oven warms up, take a Twinkie pan or mini loaf pan and generously grease it with cooking spray or butter to ensure your homemade Twinkies release easily after baking. This step is crucial for achieving that perfect golden-brown exterior.
Step 2: Prepare the Dry Ingredients
In a small bowl, sift together 1 cup of all-purpose flour, 1 teaspoon of baking powder, and a pinch of salt. This ensures that the ingredients are well combined and aerated, promoting a light and fluffy sponge cake. Set this mixture aside as you move on to the next step of the sponge batter.
Step 3: Beat the Eggs and Sugar
In a large mixing bowl, beat four large eggs together with 2/3 cup of granulated sugar using an electric mixer set to medium-high speed. Continue beating for about 6-8 minutes, or until the mixture becomes thick, pale, and forms ribbons. The volume should nearly double, indicating that you’ve incorporated plenty of air into your homemade Twinkies batter.
Step 4: Combine Wet and Dry Ingredients
Gently fold in the sifted flour mixture into the egg mixture in three batches, ensuring that you retain as much air as possible. Afterward, add 1/2 teaspoon of vanilla extract for flavor. The batter will be thick yet light, so be cautious and use a spatula to avoid deflating it.
Step 5: Mix in Milk and Melted Butter
In a separate bowl, combine 2 tablespoons of warm milk with 1 tablespoon of melted unsalted butter, then gently fold this mixture into the main batter. Mix until just combined, ensuring not to over-mix, as this can toughen the sponge. The combination of milk and butter will help create a moist texture for your homemade Twinkies.
Step 6: Fill the Pan and Bake
Carefully fill each cavity of your prepared Twinkie pan about 3/4 full with the batter. Bake in the preheated oven for 12-15 minutes, or until the tops are golden and a toothpick inserted in the center comes out clean. Keep an eye on them; you want a slight spring back when touched, indicating they are perfectly baked.
Step 7: Cool the Cakes
Once baked, remove the Twinkie pan from the oven and let it cool for about 10 minutes. Carefully run a knife around the edges to loosen each cake, then flip them onto a wire rack to cool completely. This cooling period allows the sponge to set properly before you add the mouthwatering filling.
Step 8: Prepare the Filling
In a mixing bowl, cream together 1/2 cup of softened unsalted butter until fluffy. Gradually add in 1/2 cup of marshmallow creme, 1 cup of powdered sugar, 1 teaspoon of vanilla extract, and 1 tablespoon of heavy cream. Beat until the mixture is smooth and well-combined, creating a deliciously sweet filling for your homemade Twinkies.
Step 9: Fill the Twinkies
Using a piping bag fitted with a small round tip, carefully fill each cooled sponge cake through the holes at the bottom. Apply gentle pressure while filling to ensure an even distribution of the creamy filling. Your homemade Twinkies are now ready to indulge in, with soft cake and scrumptious marshmallow creme inside!
Homemade Twinkies: Delicious Variations Await
Feel free to play around with the flavors and textures to elevate your homemade Twinkies into new delightful treats!
- Gluten-Free: Use gluten-free flour to create a similar texture without gluten, perfect for those with dietary restrictions.
- Chocolate Delight: Swap half of the all-purpose flour for cocoa powder, giving you a tasty chocolate sponge that perfectly pairs with marshmallow filling.
- Nutty Twist: Add finely chopped nuts to the sponge batter for added crunch; try walnuts or pecans for a heartier texture. A touch of nuttiness can enhance the overall flavor beautifully.
- Fruit-Filled: Incorporate a spoonful of jam or fresh fruit puree into the filling for a fruity burst; strawberry or raspberry can bring a refreshing twist to each bite.
- Dairy-Free: Substitute cow’s milk and butter with almond milk and coconut oil, allowing everyone to enjoy this nostalgic treat without dairy.
- Unique Extracts: Experiment with different extracts like almond or maple instead of vanilla to create new flavor profiles; it adds a unique character to the filling.
- Spiced Version: Infuse the batter with a pinch of cinnamon or nutmeg to warm things up; this comforting element can take your Twinkies to another level.
- Zesty Kick: Add a teaspoon of lemon or orange zest into the batter or filling; the citrus will brighten the flavor, making your homemade Twinkies refreshingly different.
And if you’re looking for more culinary adventures, don’t miss out on our delicious Homemade Pecan Bread that pairs perfectly with your sweet creations!
How to Store and Freeze Homemade Twinkies
Airtight Container: Store your homemade Twinkies in an airtight container at room temperature for up to 2 days to maintain their freshness and flavor.
Refrigeration: If you want to keep them longer, place them in the fridge, where they’ll stay tasty for up to 4-5 days. Just be sure they’re well covered!
Freezing: For longer storage, wrap individual Twinkies in plastic wrap and place them in a freezer-safe bag. They’ll maintain their quality for up to 3 months when frozen.
Reheating: To enjoy thawed Twinkies, let them sit at room temperature or warm them in the microwave for about 10-15 seconds for that fresh-out-of-the-oven experience.
Expert Tips for Homemade Twinkies
Room Temperature Eggs: Ensure your eggs are at room temperature for maximum volume when whipped, which helps create a light and fluffy sponge.
Gentle Folding: Be very gentle when folding the flour mixture into the egg mixture. Overmixing can lead to a dense sponge instead of the airy texture you want for your homemade Twinkies.
Cool Completely: Allow the sponge cakes to cool completely before filling. This prevents the marshmallow cream from melting and ensures a beautiful final product.
Twinkie Pan vs. Alternatives: A Twinkie pan is ideal, but if you don’t have one, mini loaf pans or makeshift molds will still yield delicious results.
Experiment with Fillings: Don’t hesitate to think outside the box! Try different fillings such as chocolate, lemon curd, or even fruit preserves for a unique twist on your homemade Twinkies.
Make Ahead Options
These Homemade Twinkies are fantastic for meal prep, making them a sweet stress-free treat on busy days! You can prepare the sponge cakes up to 24 hours in advance by baking and cooling them completely before storing them in an airtight container in the refrigerator. The filling can also be made ahead; whip it up and keep it chilled for up to 3 days until you’re ready to assemble. To finish, simply fill each cooled sponge cake with the prepared marshmallow crème right before serving to ensure they taste just as delicious as when freshly made. This way, you can enjoy a nostalgic dessert with minimal effort!
What to Serve with Homemade Twinkies?
Indulging in these delightful treats opens up a world of imaginative pairing possibilities to create the ultimate dessert experience.
- Creamy Mashed Potatoes: These savory delights provide a comforting contrast to the sweetness of Twinkies, creating a well-rounded meal.
- Fresh Berries: The bright acidity of strawberries, blueberries, or raspberries cuts through the sweetness, adding a refreshing touch.
- Vanilla Ice Cream: A scoop of vanilla ice cream on the side enhances the nostalgic flavors and brings a delightful creaminess.
- Chocolate Drizzle: Adding a chocolate drizzle on top of your Twinkies elevates their dessert status while introducing a rich flavor dimension.
- Casual Iced Coffee: Pair with a chilled coffee for a fun afternoon pick-me-up; the caffeine balances the sweetness of the treats.
- Whipped Cream: A fluffy dollop brings an elegant touch, enhancing the overall lightness without overpowering the flavors.
- Milk: A classic companion that beautifully complements childhood desserts, serving alongside Twinkies invokes nostalgia too.
- Fruit Salad: A mix of sweet and tart fruits adds a lightness, balancing the richness of the Twinkies.
- Lemonade: Refreshing and zesty, a glass of lemonade cleanses the palate, making each bite of the Twinkies even more enjoyable.
- Chocolate-Covered Pretzels: The sweet-and-salty combination creates a playful contrast that pairs wonderfully with spongy desserts.

Homemade Twinkies Recipe FAQs
What type of flour is best for homemade Twinkies?
All-purpose flour works beautifully as it provides the right structure for the sponge. If you’re looking for a gluten-free version, feel free to substitute it with a gluten-free all-purpose flour blend. Just ensure that the blend contains xanthan gum for the best texture!
How should I store homemade Twinkies?
To keep your homemade Twinkies fresh, store them in an airtight container at room temperature for up to 2 days. If you need to store them longer, they can be refrigerated for up to 4-5 days. Just make sure they are well covered to prevent them from drying out.
Can I freeze homemade Twinkies?
Absolutely! For freezing, wrap each Twinkie individually in plastic wrap and then place them in a freezer-safe bag. They can stay frozen for up to 3 months. When you’re ready to enjoy, simply thaw them at room temperature or pop them in the microwave for about 10-15 seconds to regain that fresh-baked warmth.
What should I do if my sponge cake turns out dense?
If your sponge cake is dense, it might be due to overmixing the batter or not incorporating enough air when beating the eggs. Ensure you beat the eggs and sugar until thick and pale, and be gentle when folding in the flour mixture to keep the airiness intact.
Is there a way to make these Twinkies dairy-free?
Yes! You can make dairy-free homemade Twinkies by using almond or oat milk in place of regular milk, substituting the unsalted butter with coconut oil, and opting for vegan butter for the filling. This way, you can still enjoy the creamy indulgence without the dairy!
Homemade Twinkies: Nostalgic Delights Made From Scratch
Ingredients
Equipment
Method
- Preheat your oven to 350°F (175°C) and grease a Twinkie pan or mini loaf pan.
- Sift together all-purpose flour, baking powder, and salt.
- Beat eggs and granulated sugar for 6-8 minutes until thick and pale.
- Fold in the flour mixture and add vanilla extract.
- Mix warm milk and melted butter into the batter.
- Fill the Twinkie pan 3/4 full and bake for 12-15 minutes.
- Cool the cakes for 10 minutes then remove from the pan.
- Cream together filling ingredients until smooth.
- Fill each cooled sponge cake using a piping bag.
Leave a Reply