
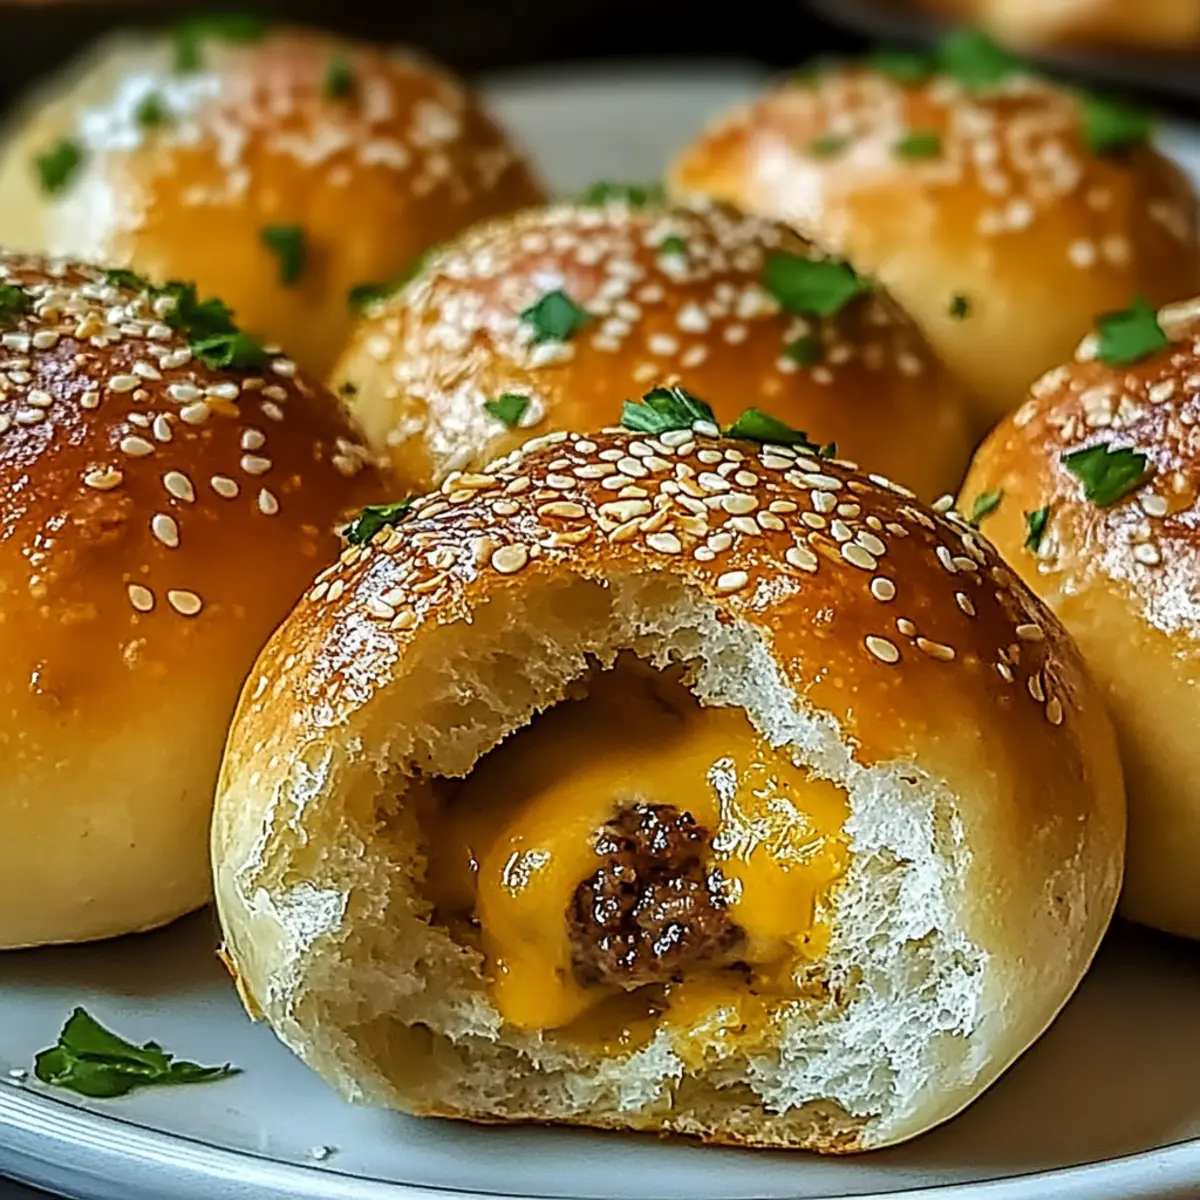
As I pulled the golden-brown Garlic Parmesan Cheeseburger Bombs from the oven, the rich, savory scent of garlic mingled perfectly with the luscious aroma of melting cheese, instantly drawing my family into the kitchen. These delightful little bites are the ultimate comfort food; they’re not just delicious, but also wonderfully customizable. You can easily swap out the ground beef for turkey or even plant-based alternatives, making them a hit among all dietary preferences. Perfect for meal prep or a quick weeknight dinner, these bombs promise to turn any meal into a moment of joy and satisfaction. So, are you ready to experience a burger in a whole new way?
Why Will You Love Cheesy Bombs?
Irresistible Flavor: The rich garlic and cheesy filling makes each bite unforgettable.
Customizable Options: Swap ground beef for turkey, chicken, or even plant-based alternatives to suit your taste.
Quick Preparation: With simple steps and easy ingredients, you’ll have these bombs ready in no time!
Perfect for Sharing: Great for parties or family dinners, these bombs are sure to please everyone. Pair them with a zesty dipping sauce for an extra treat! If you enjoy making appetizers, check out my Gooey Cheesy Garlic or Mini Garlic Toast recipes!
Meal Prep Friendly: Prepare these in advance and simply bake when ready to serve, making weeknight dinners a breeze.
Cheesy Garlic Parmesan Cheeseburger Bombs
• You’ll adore these savory, customizable delights!
For the Filling
- Ground Beef – Rich in flavor and protein; substitute with ground turkey or plant-based alternatives for a lighter option.
- Cheddar Cheese – For that melty goodness; feel free to swap for Monterey Jack or pepper jack for added zing.
- Garlic Powder – Maximum flavor enhancement; using fresh garlic? Remember, 1 clove equals about ⅛ teaspoon.
- Onion Powder – Adds a depth of flavor; opt for chopped fresh onions if you prefer, but reduce moisture.
- Salt – Balances all those incredible flavors; adjust to your preference for a personal touch.
- Black Pepper – A little spice for kick; use white pepper for a subtler taste if you like.
For the Dough
- Refrigerated Biscuit Dough – The perfect envelope for your delicious filling; try homemade dough for a fresh, personal touch.
- Unsalted Butter – Adds richness and flavor to the tops; substitute with olive oil for a dairy-free version.
For the Topping
- Minced Garlic – Brings fresh garlicky goodness; adjust the amount based on how much garlic love you desire!
- Grated Parmesan Cheese – For that irresistible, savory crust; Pecorino Romano can be a delicious alternative for more sharpness.
- Chopped Fresh Parsley – A pop of color and freshness; feel free to leave it out if you’re in a pinch.
These Cheesy Garlic Parmesan Cheeseburger Bombs are a culinary adventure just waiting to happen! Get ready to impress with these mouthwatering, easy-to-make delights!
Step‑by‑Step Instructions for Cheesy Garlic Parmesan Cheeseburger Bombs
Step 1: Preheat Oven and Prepare Baking Sheet
Start by preheating your oven to 375°F (190°C). While the oven warms up, line a baking sheet with parchment paper to ensure your Cheesy Garlic Parmesan Cheeseburger Bombs bake evenly and don’t stick. This will make cleanup a breeze, allowing you to focus on the deliciousness ahead.
Step 2: Cook Ground Beef
In a skillet over medium heat, brown 1 pound of ground beef, stirring frequently for about 6-8 minutes until fully cooked. Once it’s no longer pink, drain any excess fat, then season it generously with garlic powder, onion powder, salt, and black pepper. Allow the mixture to cool for a few minutes while you get the dough ready.
Step 3: Prepare the Biscuit Dough
Take your refrigerated biscuit dough and flatten out 8 rounds to about 3 inches wide. This will create a nice pocket for your filling. A rolling pin or your hands can help with the flattening—the key is to ensure each piece is uniform to prevent tearing when you seal them around the savory filling.
Step 4: Add the Filling
Place a generous spoonful of the cooled beef mixture at the center of each flattened dough round, followed by a cube of cheddar cheese. Be careful not to overfill; just enough to contain the flavors without spilling out during baking. The luscious melting cheese will elevate your Cheesy Garlic Parmesan Cheeseburger Bombs to another level!
Step 5: Seal the Dough
Gently fold the dough over the filling, pinching the seams together to seal the bombs tightly. Then, roll each filled dough into a smooth ball in your hands. This step is crucial for keeping all the delicious ingredients inside as they bake, creating a delightful surprise in every bite.
Step 6: Arrange on Baking Sheet
Place the sealed balls seam-side down onto your prepared baking sheet. This position ensures they hold their shape while baking. Arrange them with some space in between to allow for rising, which will create that soft, fluffy texture we all love in these Cheesy Garlic Parmesan Cheeseburger Bombs.
Step 7: Prepare the Garlic Butter Topping
In a small saucepan, melt some unsalted butter over low heat and stir in minced garlic. Once melted and fragrant, brush this garlic-infused butter generously over each dough ball. This step is key to achieving a rich, flavorful crust enhanced by the garlic aroma as they bake.
Step 8: Sprinkle with Parmesan and Bake
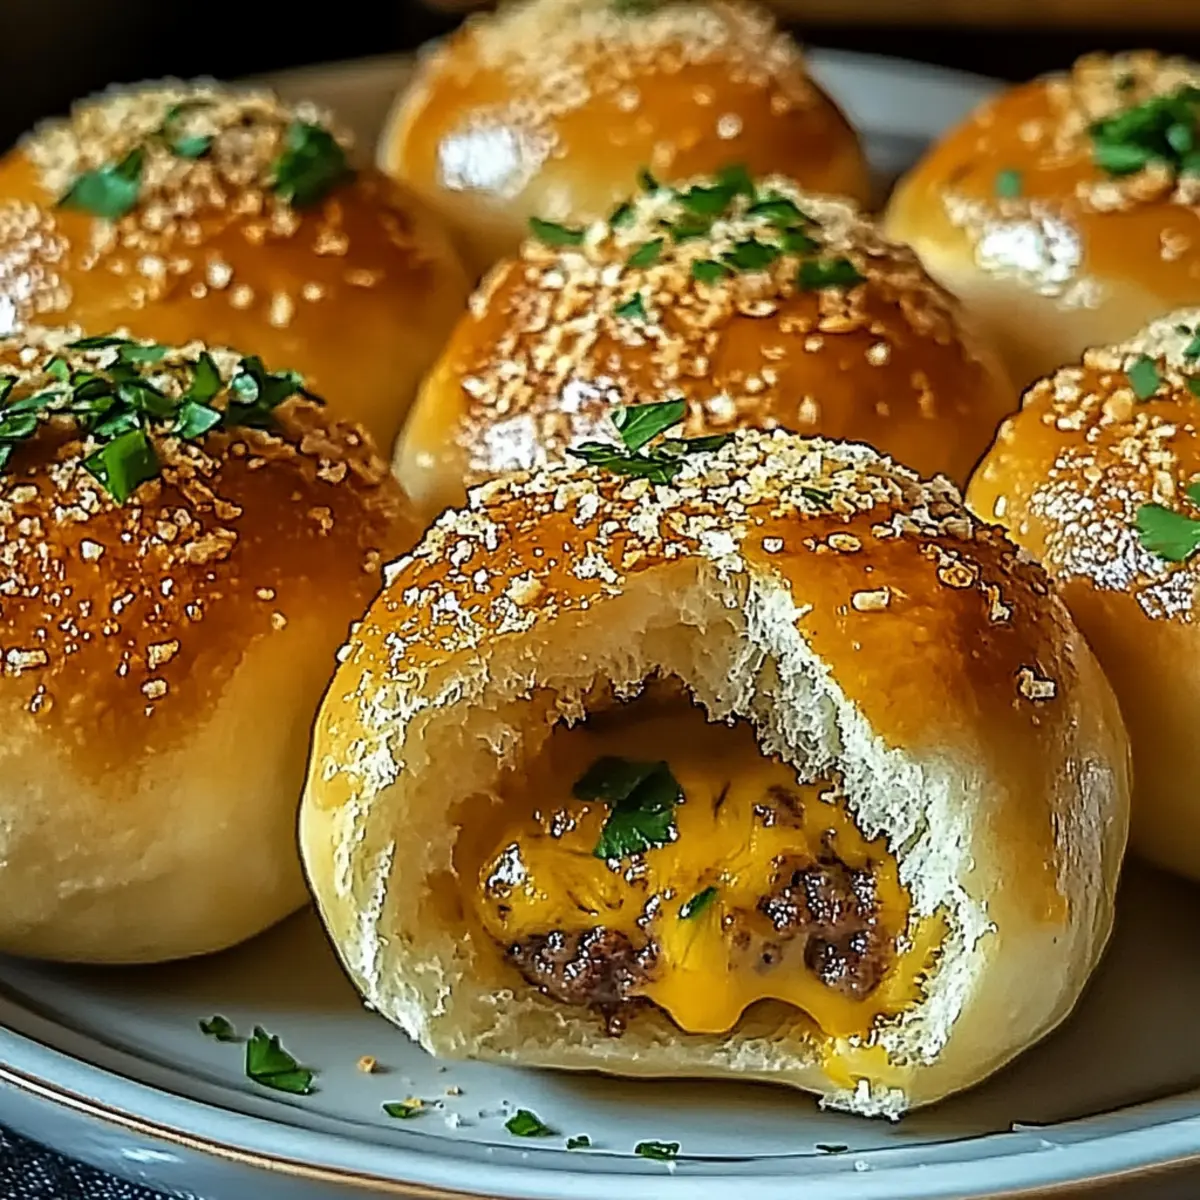
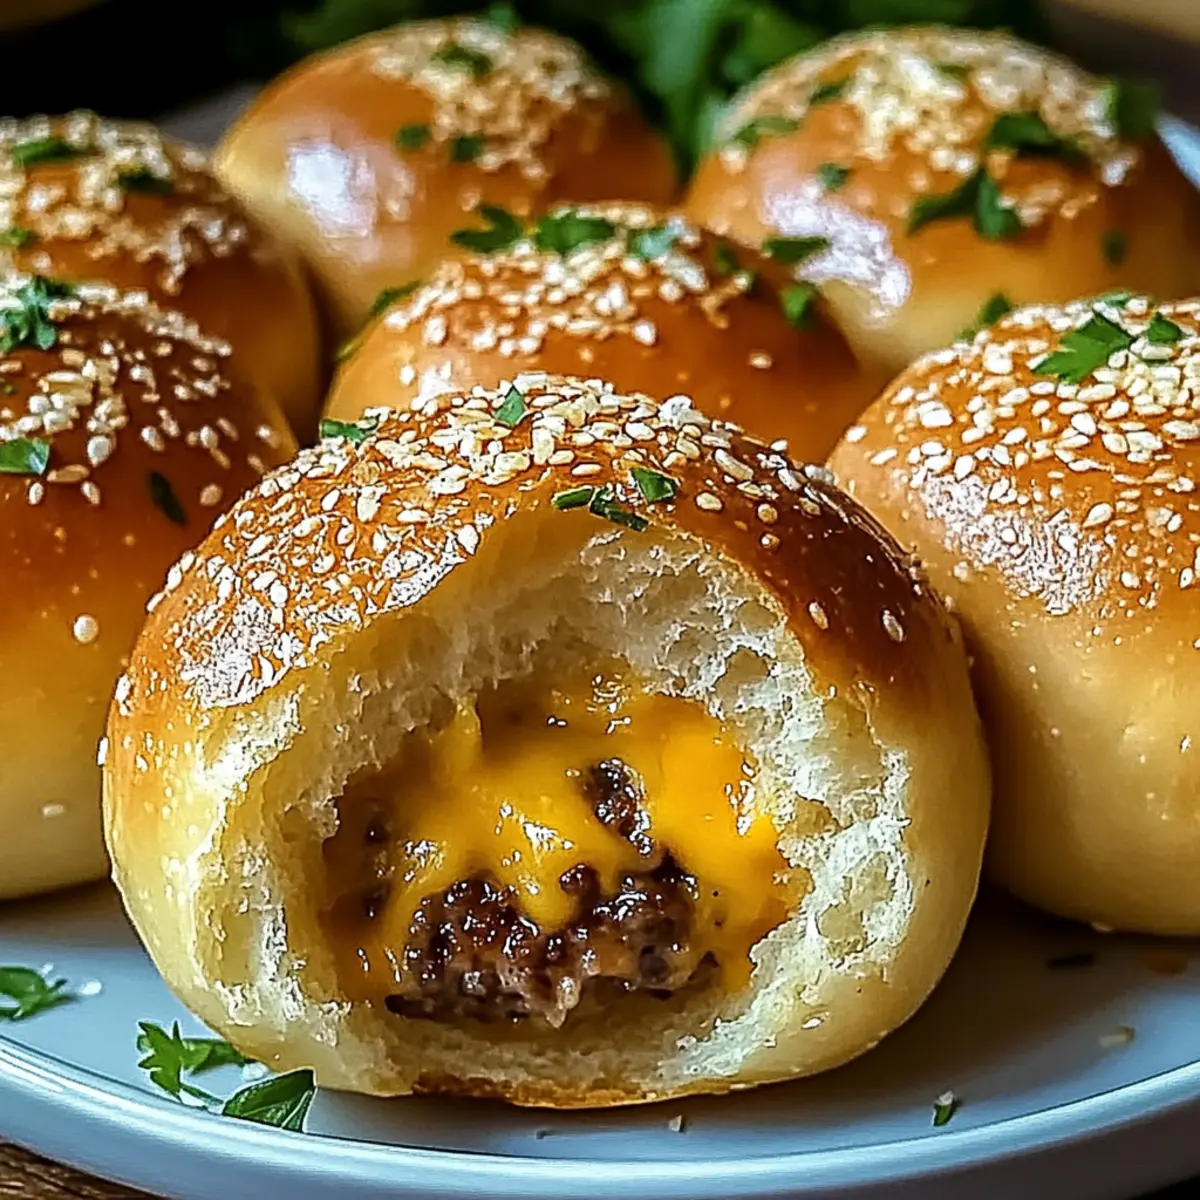
Sprinkle grated Parmesan cheese over the top of each bomb, adding an irresistible crust. Once covered, place the baking sheet into your preheated oven and bake for 15-18 minutes. They should turn golden brown and look delightfully puffy, indicating they’re ready to make a flavorful entrance!
Step 9: Cool and Serve
Once baked, remove the bombs from the oven and let them cool slightly, about 5 minutes. This will make them easier to handle. Serve warm alongside your favorite dipping sauces, allowing your family and friends to enjoy the gooey, cheesy goodness that lies within each delicious Cheesy Garlic Parmesan Cheeseburger Bomb!
Expert Tips for Cheesy Garlic Parmesan Cheeseburger Bombs
-
Choose the Right Beef: Use an 80/20 fat ratio ground beef for juicier and more flavorful bombs. Avoid lean cuts that may dry out during cooking.
-
Seal Properly: Ensure the dough is well-sealed around the filling to prevent leaks. If the dough tears, let it rest at room temperature for 10 minutes before patching it up.
-
Reheat with Care: When reheating leftovers, always use the oven instead of the microwave. This keeps the Cheesy Garlic Parmesan Cheeseburger Bombs crispy on the outside.
-
Experiment with Fillings: Don’t hesitate to swap the beef for ground turkey or plant-based alternatives for a lighter option. You can also add diced jalapeños for a spicy kick!
-
Keep It Fresh: If using fresh garlic instead of garlic powder, remember that about 1 clove equals roughly ⅛ teaspoon of garlic powder. Adjust based on your flavor preference.
How to Store and Freeze Cheesy Garlic Parmesan Cheeseburger Bombs
Fridge: Store leftovers in an airtight container for up to 3 days. Make sure they are fully cooled before sealing to maintain freshness.
Freezer: These bombs can be frozen uncooked for up to 2-3 months. Assemble them, then place the prepared bombs on a sheet tray in the freezer before transferring to a zipper bag for easy storage.
Reheating: For best results, reheat cooked bombs in the oven at 350°F (175°C) for about 10-15 minutes until heated through and crispy. Avoid microwaving, as this can make them soggy.
Make-Ahead Tips: Prepare the cheeseburger bombs in advance and keep them in the fridge. Just pop them in the oven when you’re ready to serve for a quick and satisfying meal!
Cheesy Garlic Parmesan Cheeseburger Bombs Variations
Feel free to mix and match with these delightful options that truly make this dish your own!
-
Turkey Swap: Substitute ground beef with ground turkey for a leaner, just as flavorful option.
-
Vegetarian Delight: Use finely chopped vegetables or plant-based ground meat for a meat-free version that’s just as satisfying.
-
Cheese Variety: Swap cheddar for pepper jack or Monterey Jack to spice things up and add a creamy twist.
-
Extra Garlic: If you can’t get enough garlic flavor, add roasted garlic in place of minced or powdered garlic for an aromatic hit.
-
Textural Boost: Consider adding crispy bacon bits into the filling for an extra crunch that family and friends will rave about.
-
Heat Injection: Mix in diced jalapeños for a spicy surprise or drizzle hot sauce in the filling for a fiery kick.
-
Flavor Fusion: Incorporate BBQ sauce into the ground meat mixture for a sweet and tangy experience that transforms your bombs into mini BBQ bites.
-
Homemade Dough: Try making your own biscuit or pizza dough for a fresher taste that really elevates this comforting classic.
These Cheesy Garlic Parmesan Cheeseburger Bombs are versatile and bursting with flavor! For a fabulous appetizer idea, you might also enjoy my Garlic Parmesan Crockpot chicken. And if you’re inclined towards a cheesy treat, don’t forget to check out my Gooey Cheesy Garlic wraps!
What to Serve with Cheesy Garlic Parmesan Cheeseburger Bombs
Imagine gathering around the table, the air filled with savory aromas from your freshly baked delights, as your loved ones dig into a meal designed for sharing and satisfaction.
-
Crispy French Fries: The classic pairing of fried potatoes adds a delightful crunch that balances the soft and gooey textures of the bombs.
-
Fresh Garden Salad: A light, crisp salad with a tangy vinaigrette offers a refreshing contrast, making every bite of the bomb even more satisfying. The freshness brightens the meal beautifully.
-
Creamy Coleslaw: The cool, creamy slaw adds a nice tangy crunch that complements the cheeseburger flavor and enhances the overall hearty experience.
-
Zesty BBQ Sauce: A side of zesty BBQ sauce for dipping turns every bite into a smoky adventure that pairs perfectly with the rich garlic and cheese.
-
Buffalo Sauce: For those who love a kick, serve alongside a spicy buffalo sauce. The heat cuts through the richness of the bomb, creating a balanced burst of flavor.
-
Garlic Breadsticks: Add some extra garlicky goodness to your feast! The soft, buttery breadsticks echo the flavors of the garlic parmesan bombs, creating a cohesive dining experience.
-
Onion Rings: Crispy onion rings bring another layer of crunch and flavor, making them a fun, sharable addition that elevates your meal to a new level.
-
Chilled Beer or Cider: A refreshing glass of your favorite beer or hard cider pairs excellently, enhancing the comforting experience of the Cheesy Garlic Parmesan Cheeseburger Bombs.
-
Chocolate Chip Cookies: End the meal with a sweet touch. Warm, gooey chocolate chip cookies provide a perfect sweet balance after savoring your savory bomb feast.
Make Ahead Options
These Cheesy Garlic Parmesan Cheeseburger Bombs are perfect for meal prep, allowing you to enjoy homemade comfort food without the last-minute rush! You can prepare the filling (ground beef mixture) and assemble the bombs up to 24 hours in advance. Simply refrigerate the uncooked bomb assembly in an airtight container to maintain freshness. When you’re ready to bake, just follow the final steps by brushing with garlic butter, adding cheese, and popping them in the oven. If you want to prep even further ahead, you can freeze the uncooked bombs for up to 3 months; bake straight from frozen, adjusting the bake time as necessary. This makes weeknight meals a breeze, providing the same delicious flavor with minimal effort!

Cheesy Garlic Parmesan Cheeseburger Bombs Recipe FAQs
How can I tell if my garlic is fresh?
Fresh garlic should be firm and free from any soft spots or dark blemishes. If you detect any sprouting, it might still be safe to use, but the flavor won’t be as robust. Trust your senses—the stronger the aroma, the fresher the garlic!
What’s the best way to store leftover Cheesy Garlic Parmesan Cheeseburger Bombs?
Store your leftovers in an airtight container in the fridge for up to 3 days. Ensure they’re completely cooled before sealing to maintain their deliciousness. If you have some extra time, reheating them in the oven helps regain that delightful crunch and gooey center.
Can I freeze uncooked Cheesy Garlic Parmesan Cheeseburger Bombs?
Absolutely! Assemble your bombs and place them on a baking sheet lined with parchment paper. Freeze them until solid, then transfer to a zip-top bag for storage. They can be frozen for up to 2-3 months! Just bake them straight from the freezer, adding a few extra minutes to the cooking time.
What if my dough tears while sealing the bombs?
If you find that your dough is tearing, it’s likely too cold or dry. Allow it to sit at room temperature for about 10 minutes to soften. You can also patch it together gently, ensuring a good seal so all that cheesy goodness stays inside while baking.
Are there any dietary considerations I should keep in mind?
Yes! Garlic and onions can be harmful to pets, so keep your delicious Cheesy Garlic Parmesan Cheeseburger Bombs out of reach of furry friends. If you have any allergies, substitute ingredients to fit your needs, like using dairy-free cheese or gluten-free dough for those with sensitivities.
What should I do if there’s leftover filling?
If you end up with extra filling, don’t fret! Store it in the fridge for up to 3 days and use it in scrambled eggs, as a taco filler, or even in a flavorful pasta dish. Waste not, want not, right?
Cheesy Garlic Parmesan Cheeseburger Bombs You’ll Crave
Ingredients
Equipment
Method
- Preheat your oven to 375°F (190°C) and line a baking sheet with parchment paper.
- In a skillet over medium heat, brown the ground beef for about 6-8 minutes until fully cooked. Season with garlic powder, onion powder, salt, and black pepper, then allow to cool.
- Flatten out the refrigerated biscuit dough into 8 rounds about 3 inches wide.
- Place a spoonful of the cooled beef mixture and a cube of cheddar cheese in the center of each dough round.
- Fold the dough over, seal tightly, and shape into balls.
- Place the sealed balls seam-side down on the baking sheet with space between each.
- Melt unsalted butter in a small saucepan over low heat, stir in minced garlic, and brush over each dough ball.
- Sprinkle grated Parmesan cheese over the top, then bake for 15-18 minutes until golden brown.
- Let cool slightly before serving warm with your favorite dipping sauces.
Leave a Reply