
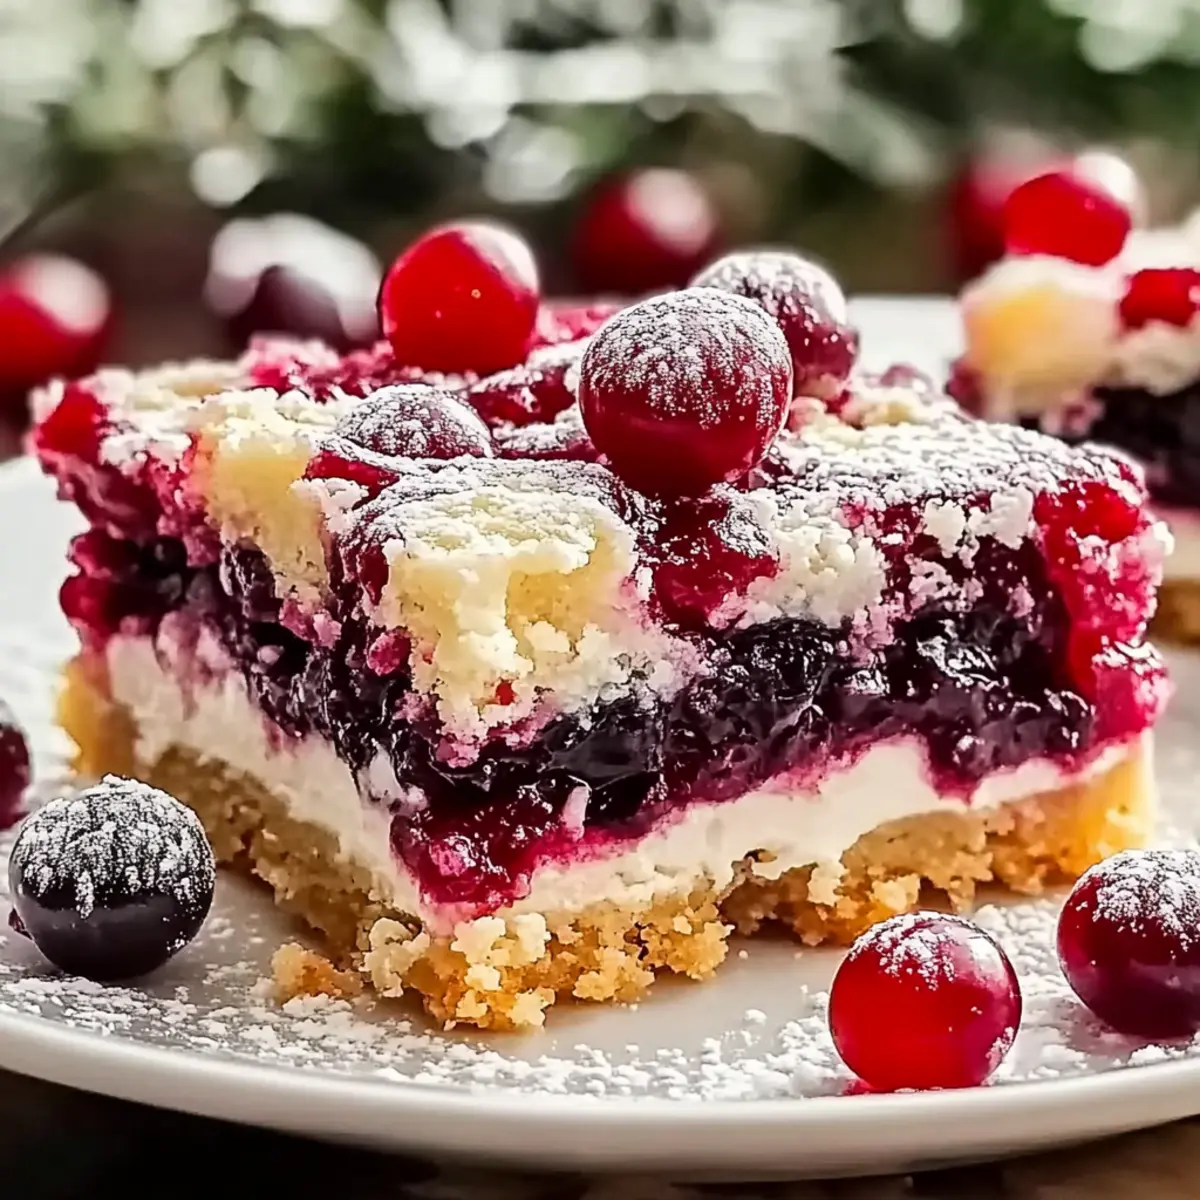
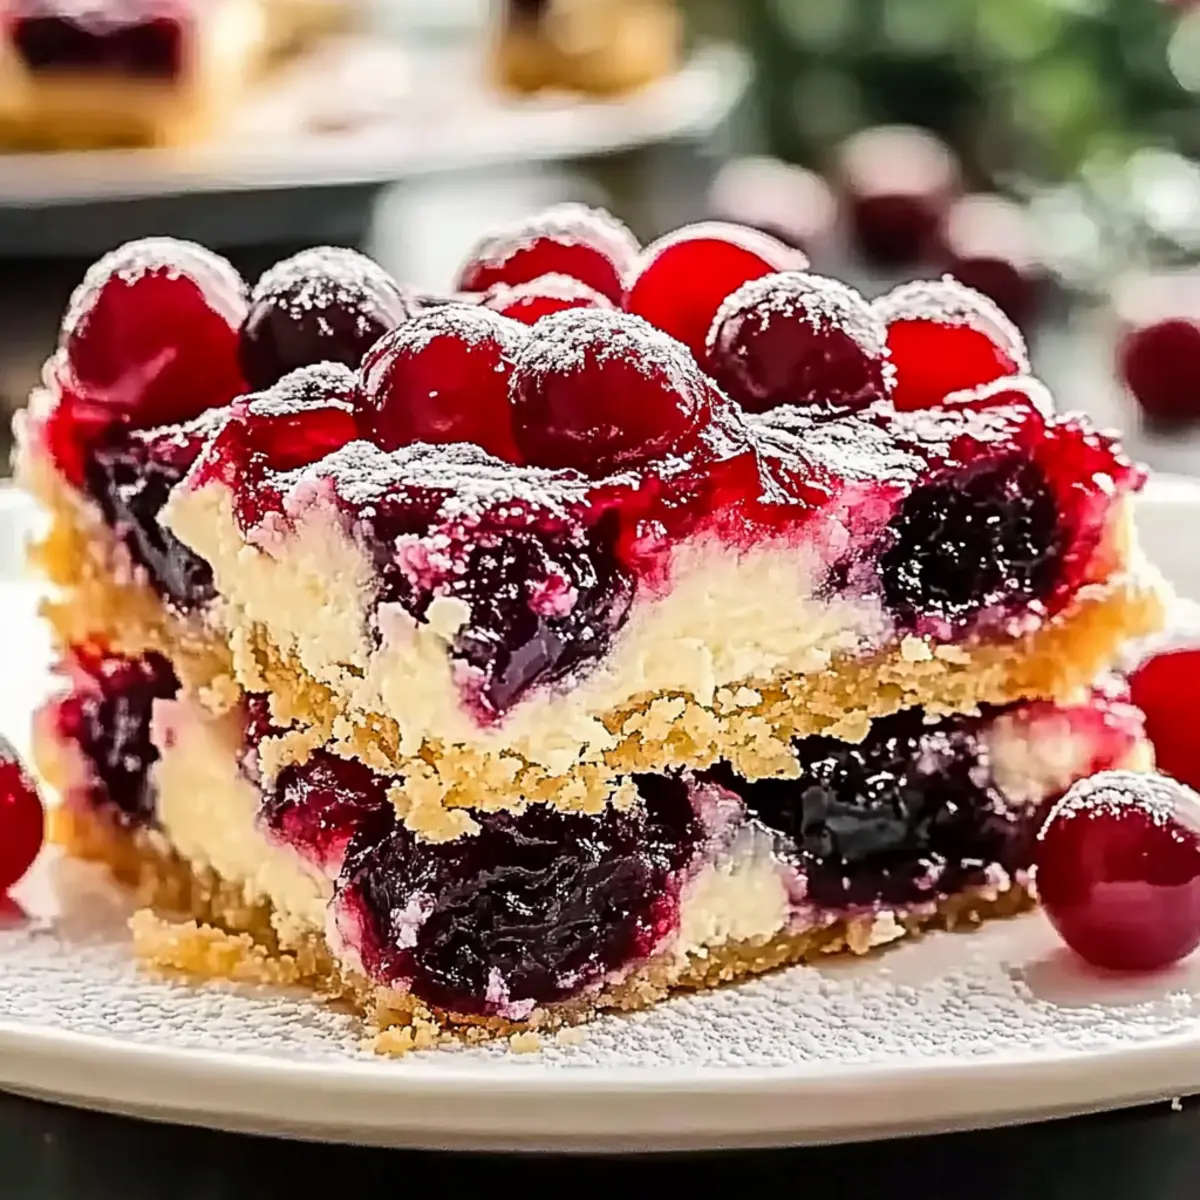
“Did you hear that joyful laughter coming from the kitchen? That’s the magic of baking Christmas Cherry Bars! These delightful treats marry a buttery crust with a creamy layer and a tart cherry topping, creating a festive dessert that’s perfect for holiday gatherings. What I love most about this Christmas Cherry Bars recipe is its ability to make you look like a baking pro without spending hours slaving away in the kitchen. With just 50 minutes from start to finish, it’s a crowd-pleasing gem sure to impress friends and family alike. Plus, the simplicity of this recipe means that even novice bakers can dive in and create something spectacular. Ready to add a little sweetness to your holiday celebrations? Let’s get started!”

Why is this recipe a festive favorite?
Simplicity and Speed: This Christmas Cherry Bars recipe comes together in just 50 minutes, making it perfect for busy holiday schedules.
Creamy and Delicious: The rich cream cheese layer beautifully balances the tartness of cherries, creating a harmonious dessert that everyone will love.
Customizable Goodness: You can easily personalize it with different fruit preserves or even add chocolate chips for a delightful twist.
Perfect for Gifting: These bars make thoughtful, homemade gifts when packaged in festive boxes, echoing the spirit of the season!
Crowd-Pleasing Appeal: Whether at holiday parties or cozy family gatherings, these bars are sure to impress and satisfy. Dive into the season’s deliciousness with these festive treats!
Christmas Cherry Bars Ingredients
For the Base
- Unsalted Butter – Adds richness and structure; opt for European-style for superior flavor.
- Granulated Sugar – Sweetens the dough, ensuring a delightful texture.
- Large Eggs – Provides moisture and binding; fresh eggs are key for best results.
- Vanilla Extract – Enhances the overall flavor; always choose pure for the best taste.
- All-Purpose Flour – Forms the solid base of the bars; can be swapped for a gluten-free blend.
- Baking Powder – Ensures a light, airy texture; check expiration for best results.
- Salt – Balances sweetness and amplifies flavors.
For the Cream Cheese Layer
- Cream Cheese – Delivers creaminess and moisture; full-fat is essential for the right consistency.
- Powdered Sugar – Sweetens the cream cheese layer for a smooth and rich texture.
- Whole Milk – Adjusts the cream cheese mixture’s consistency to perfection.
- Almond Extract – Adds a unique flavor that pairs well with cherries; can be swapped with vanilla.
For the Cherry Topping
- Cherry Pie Filling – The star of the dessert, adding sweet-tart notes; consider brands with whole cherries.
- Reserved Dough – Used as a rustic topping for added texture and appearance.
With these ingredients, you’re well on your way to creating festive Christmas Cherry Bars that will dazzle your holiday gatherings!
Step‑by‑Step Instructions for Christmas Cherry Bars Recipe
Step 1: Preheat and Prepare the Pan
Begin by preheating your oven to 350°F (175°C). While the oven warms up, prepare a 10×15-inch baking pan by greasing it with butter or cooking spray and lining it with parchment paper, allowing some overhang for easy removal later. This ensures your Christmas Cherry Bars bake evenly and come out easily when ready to serve.
Step 2: Cream the Butter and Sugar
In a large mixing bowl, combine softened unsalted butter and granulated sugar. Using an electric mixer, beat the mixture on medium speed for 3-4 minutes until it becomes pale and fluffy; this aeration is key for a light texture in your Christmas Cherry Bars. Scrape down the sides of the bowl as needed to incorporate all the ingredients fully.
Step 3: Add Eggs and Vanilla
Once the butter and sugar are well mixed, crack in the large eggs one at a time, ensuring each one is fully incorporated before adding the next. After the last egg, mix in pure vanilla extract, continuing to beat on medium speed until everything is smooth and creamy. The mixture should look light and airy, which is crucial for your dessert’s structure.
Step 4: Combine Dry Ingredients
In a separate bowl, whisk together the all-purpose flour, baking powder, and salt. Gradually add this dry mixture to your butter-egg mixture, blending on low speed just until combined. Avoid overmixing—this helps achieve the perfect textured base for your Christmas Cherry Bars, so you should still see some flour streaks.
Step 5: Spread Dough in the Pan
Take about three-quarters of your dough and evenly spread it into the prepared pan, creating a solid base. Use a spatula to ensure an even layer, pressing the dough down gently. This crust will serve as the foundation for the creamy and fruity layers above, so aim for a consistent thickness throughout.
Step 6: Prepare the Cream Cheese Layer
In a medium bowl, beat the cream cheese with powdered sugar, almond extract, and whole milk until the mixture is completely smooth and creamy. This should take about 2-3 minutes of mixing. Once ready, carefully spread this luscious cream cheese layer over the dough layer in the pan, smoothing it out with a spatula for an even finish.
Step 7: Add Cherry Topping
Next, spoon the cherry pie filling over the cream cheese layer, spreading it evenly with a spatula. Ensure that you cover the cream layer completely for a beautiful final presentation. The tartness of the cherries will offer a delightful contrast to the creamy and buttery base in your Christmas Cherry Bars.
Step 8: Add Reserved Dough Topping
Now, take the reserved dough that you set aside earlier and drop spoonfuls of it over the cherry filling. This rustic topping creates a charming look on your Christmas Cherry Bars while adding extra texture. Distributing it evenly will also help ensure every bite has that delectable doughy goodness.
Step 9: Bake to Perfection
Place the baking pan in the preheated oven and bake for 30-35 minutes. Keep an eye on the bars, looking for a golden brown top and edges that start to pull away from the pan. Press gently in the center; if it springs back, you know your Christmas Cherry Bars are done.
Step 10: Cool and Slice
Once baked, remove the pan from the oven and allow the bars to cool completely on a wire rack for about 2 hours. This step is essential for achieving clean cuts later. Once cooled, lift the bars out using the parchment paper, and cut into 24 squares to share with family and friends, revealing the gorgeous layers within!

How to Store and Freeze Christmas Cherry Bars
Room Temperature: Keep the Christmas Cherry Bars at room temperature for up to 2 days in an airtight container to maintain their deliciousness.
Fridge: For extended freshness, store the bars in the fridge for up to 1 week. This will enhance the creamy texture of the cream cheese layer.
Freezer: If you want to make these bars ahead of time, freeze them in an airtight container or freezer bag for up to 1 month. Thaw overnight in the refrigerator before serving.
Reheating: If you’d like to enjoy them warm, briefly microwave individual bars for 10-15 seconds until just warmed—perfect with a scoop of ice cream!
Make Ahead Options
These Christmas Cherry Bars are perfect for meal prep, allowing you to savor the joyful baking experience with minimal stress! You can prepare the crust and cream cheese layer up to 24 hours in advance; simply store them separately in the refrigerator. The crust can be baked ahead and stored at room temperature, wrapped tightly to maintain freshness. When you’re ready to serve, spread the cherry filling over the cream cheese layer and bake as directed. For optimal texture, make sure the cream cheese mixture is at room temperature before layering; this helps it spread evenly and creates a seamless blend of flavors. Enjoy delicious holiday treats without the last-minute rush!
Christmas Cherry Bars Recipe Variations
Feel free to let your creativity flow and customize this recipe just the way you like it!
- Chocolate Chip Twist: Add ½ cup mini chocolate chips to the dough for an extra chocolatey delight that balances beautifully with cherries. Your taste buds will dance with joy!
- Maple Syrup Sweetness: Substitute part of the granulated sugar with maple syrup to give your bars a unique, warm flavor, perfect for cozy holiday gatherings.
- Zesty Lemon Upgrade: Incorporate lemon zest into the cream cheese layer or swap in lemon extract for a refreshing twist that brightens up the flavors, making your bars unforgettable.
- Berry Goodness: Experiment with different fruit preserves like raspberry or lingonberry for a delightful fruity surprise that’ll keep everyone guessing!
- Dairy-Free Option: Use a dairy-free cream cheese alternative along with coconut milk to whip up a deliciously creamy version that everyone can enjoy.
- Nutty Crunch: Fold in some chopped walnuts or pecans into the dough for added texture and crunch, enhancing the flavor profile of your bars.
- Spiced Up Delight: Add a pinch of cinnamon or nutmeg to the dough for a warm, spiced backdrop that perfectly complements the cherries.
If you’re wrapping up holiday gifts, consider pairing these bars with treats like Christmas Cookies Butterscotch or creating a delightful dessert spread with Cheesy Christmas Lasagna! Enjoy the flavors of the season.
Expert Tips for Christmas Cherry Bars
-
Room Temperature Ingredients: Always use room-temperature butter and cream cheese for easier mixing and to prevent lumps in your creamy layer.
-
Avoid Soggy Bars: To prevent soggy bottoms, ensure your cream cheese layer is well-prepared and avoid making it too runny; use full-fat cream cheese for the best results.
-
Don’t Overmix: When combining wet and dry ingredients, mix until just combined. Overmixing can lead to tough bars instead of the tender texture you want in these Christmas Cherry Bars.
-
Chill for Clean Cuts: For beautifully sliced bars, chill them in the fridge for about 30 minutes before cutting. Wipe your knife between cuts for neat edges.
-
Store Properly: Store leftover bars in an airtight container at room temperature or in the fridge for up to a week. They also freeze well for up to a month, making them a perfect make-ahead treat!
What to Serve with Christmas Cherry Bars?
What’s better than a sweet treat during the holidays? Complement your Christmas Cherry Bars with delightful sides and drinks that enhance their festive charm.
-
Vanilla Ice Cream: The classic choice that adds a creamy richness, melting beautifully over the warm bars for an indulgent dessert experience.
-
Fresh Whipped Cream: Light and airy, whipped cream brightens the cherries and balances the bar’s richness perfectly. A sprinkle of cinnamon on top adds a seasonal touch!
-
Coffee or Hot Chocolate: The warm, comforting flavors of coffee or hot chocolate create a cozy pairing, perfect for enjoying with family by the fire during chilly nights.
-
Apple Crisp: This warm, spiced dessert complements the tart cherry topping, adding a homey flavor contrast that feels like a warm embrace.
-
Fruit Salad: A bright, refreshing fruit salad with seasonal fruits offers a contrast of textures and adds a touch of freshness to balance the richness of the bars.
-
Mulled Wine: The warm, spiced flavors of mulled wine create a festive atmosphere and pairs delightfully with the sweet and tart flavors of the cherry bars.
Embrace the festive spirit this holiday season with these delicious accompaniments, turning a sweet treat into a memorable meal!
Christmas Cherry Bars Recipe FAQs
How do I select the best cherries for this recipe?
Absolutely! When picking cherries, look for firm, plump fruits without dark spots or blemishes. Fresh cherries should be vibrant in color and should give off a sweet aroma. If using cherry pie filling, choose a brand that features whole cherries for a more appealing presentation.
How should I store leftover Christmas Cherry Bars?
For short-term storage, keep your bars at room temperature in an airtight container for up to 2 days. If you’d like to keep them fresher longer, transfer them to the refrigerator, where they can last for up to a week. The cold will enhance the creamy texture of the layers.
Can I freeze Christmas Cherry Bars?
Absolutely! These bars can be frozen for up to 1 month. To do this, let them cool completely, then cut into squares, and wrap each piece in plastic wrap and aluminum foil. Place them in a freezer-safe bag or container. When you’re ready to enjoy them, thaw overnight in the refrigerator before serving.
What if my bars are too soft or soggy after baking?
Very good question! If your bars turn out too soft, it could be due to underbaking or not allowing them to cool completely. Make sure to bake them until the edges pull away slightly from the pan and they feel springy to the touch. If you find the cream cheese mixture too runny, try using full-fat cream cheese and ensure it’s well-blended to prevent excess moisture.
Can I make these bars gluten-free?
Absolutely! Swap out the all-purpose flour for a gluten-free baking blend. Just make sure your blend includes xanthan gum, as it helps to mimic the structure of traditional flour. This way, everyone can enjoy these festive treats without worry!
Are there any dietary considerations when making this dessert?
Definitely! If you’re catering to allergies, ensure you check labels on products like cherry pie filling and almond extract, as they may contain allergens. Additionally, if serving to pets, avoid giving them any treats with cream cheese or cherries, as some fruits can be harmful to animals.
Creamy Christmas Cherry Bars Recipe for Holiday Bliss
Ingredients
Equipment
Method
- Preheat your oven to 350°F (175°C) and prepare a 10x15-inch baking pan by greasing it and lining with parchment paper.
- In a large bowl, cream together softened butter and granulated sugar until pale and fluffy, about 3-4 minutes.
- Add eggs one at a time, beating well after each addition, then mix in vanilla extract until smooth.
- In a separate bowl, whisk together flour, baking powder, and salt; gradually add to the butter mixture, mixing until just combined.
- Spread three-quarters of the dough into the prepared pan to form a solid base.
- In a medium bowl, beat together cream cheese, powdered sugar, almond extract, and whole milk until smooth, then spread over the base.
- Spoon cherry pie filling over the cream cheese layer, spreading it evenly.
- Drop spoonfuls of reserved dough over the cherry filling for texture.
- Bake in the preheated oven for 30-35 minutes until golden brown and edges start to pull away from the pan.
- Allow the bars to cool completely on a wire rack for about 2 hours before cutting into 24 squares.
Leave a Reply