
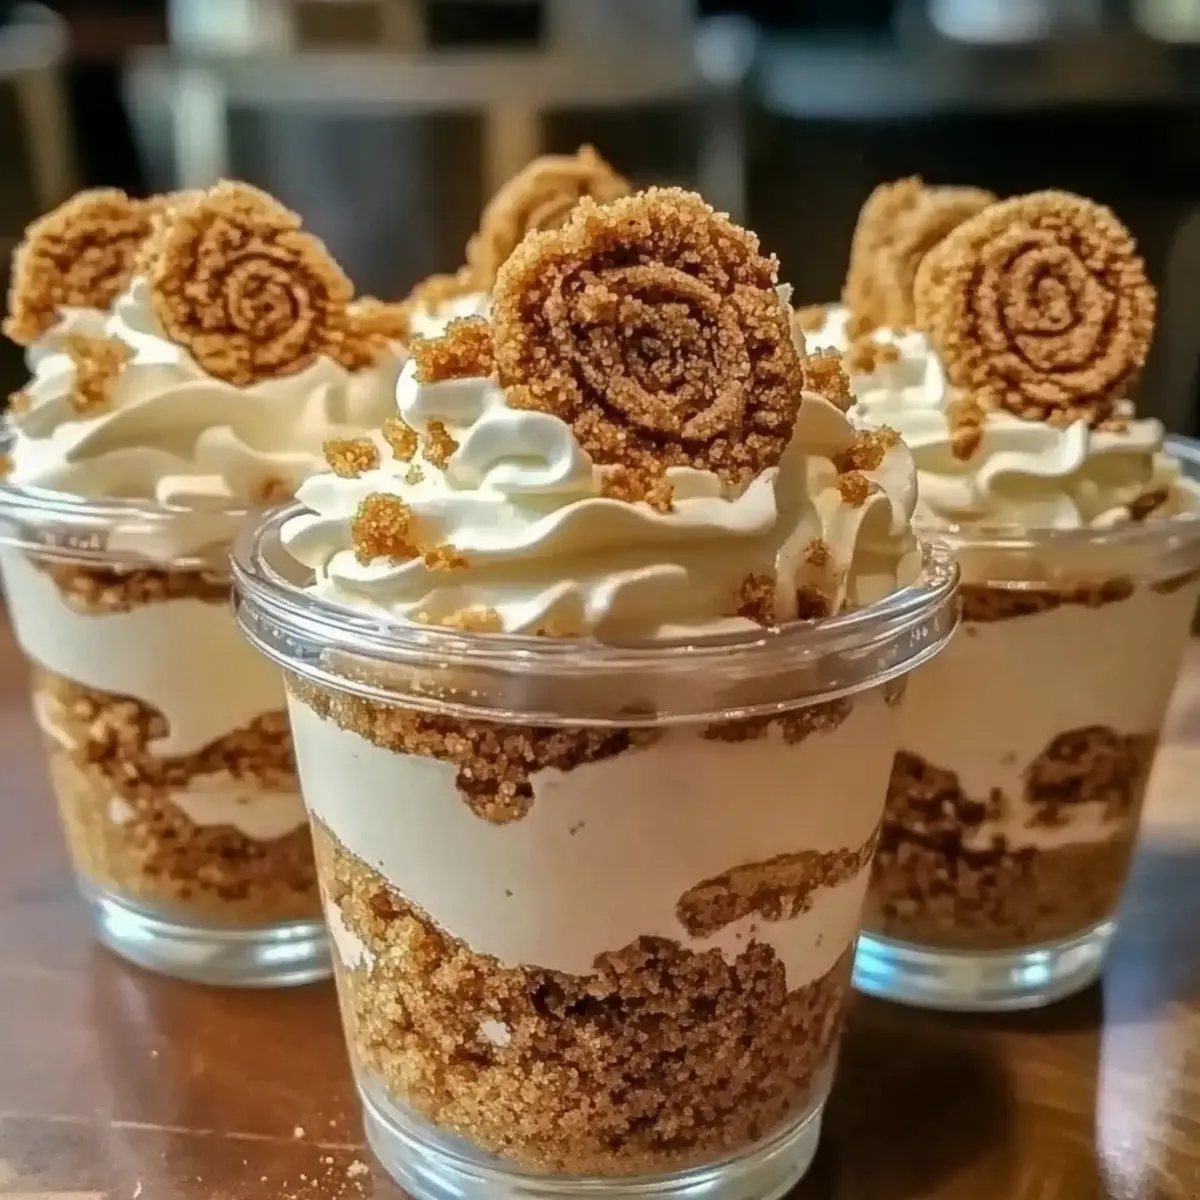
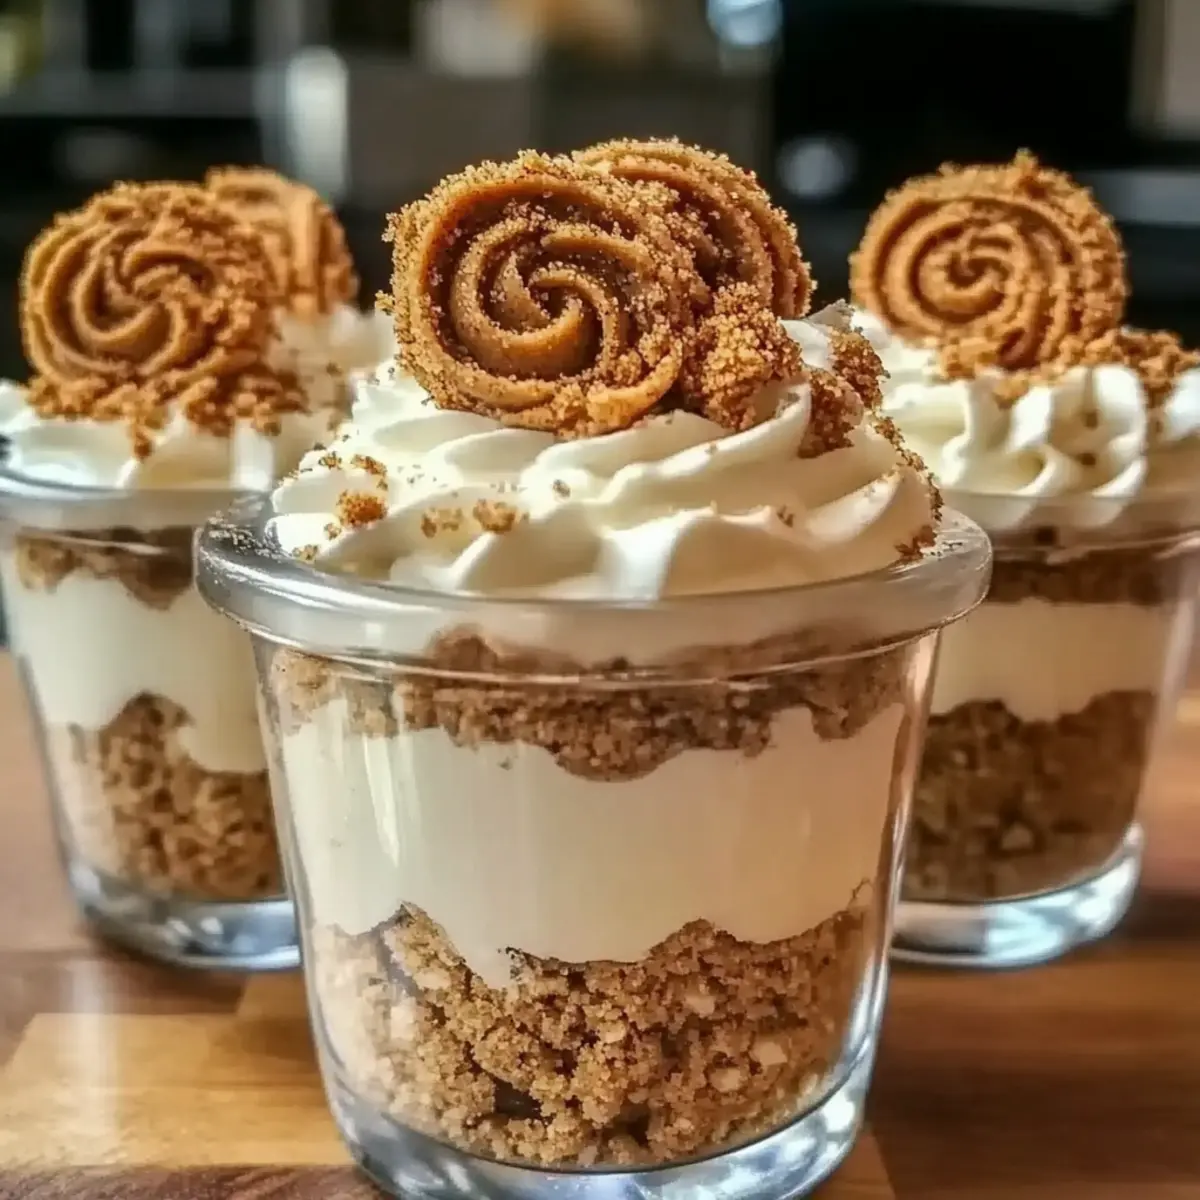
As I stood in my kitchen, my fingers dusted with cookie crumbs, it hit me: the best desserts don’t have to be complicated or heat up the oven. Enter the No-Bake Cookie Butter Cheesecake Cups—delightfully creamy, decadently sweet, and a breeze to whip up! With their luscious cheesecake filling and a delightful crunch from the cookie base, these cups are a crowd-pleasing dessert ideal for everything from cozy nights in to festive gatherings. Plus, they’re a no-fuss, quick treat to prepare, which means more time for enjoying life’s happy moments. Ready to learn how to create these irresistible bites of bliss? Let’s dive in!
Why will you love these cheesecake cups?
Creamy Deliciousness: These No-Bake Cookie Butter Cheesecake Cups are incredibly easy to prepare, requiring no baking skills at all.
Quick to Make: You can whip them up in under 30 minutes, leaving you plenty of time to relax and enjoy.
Crowd-Pleaser: Perfect for parties or family gatherings, these cups offer individual servings that wow everyone.
Flavor Explosion: The blend of creamy cheesecake and spiced cookie butter is a taste sensation that you won’t soon forget!
Versatile Options: Mix it up! Substitute cookie butter for peanut butter or use different cookie crumbs to create your personalized twist.
With these simple features, you’ll find yourself wanting to make them again and again! For more delightful dessert ideas, check out my Caramel Apple Cheesecake or indulge in some Monster Cookie Dough dip for a fun twist!
Cookie Butter Cheesecake Cups Ingredients
For the Crust
• Biscoff or speculoos cookie crumbs – Adds a sweet and crispy base; can substitute with gingersnap crumbs if preferred.
• Melted butter – Binds the cookie crumbs for a cohesive crust; unsalted butter is recommended for better salt control.
For the Cheesecake Filling
• Cream cheese (8 oz, softened) – Provides the creamy richness and structure of the cheesecake filling; use full-fat for best results.
• Powdered sugar (¾ cup) – Sweetens the filling and contributes to a smooth texture; adjust based on desired sweetness.
• Cookie butter (½ cup plus extra for drizzling) – Adds a rich, spiced flavor that defines the dessert; peanut butter can be used for a twist.
• Vanilla extract (1 tsp) – Enhances the flavors of cream cheese and cookie butter.
• Heavy whipping cream (1 cup) – Creates a light and fluffy mousse when whipped; can substitute with a non-dairy alternative for a vegan version.
For Garnish
• Extra cookies for garnish (optional) – Adds visual appeal; feel free to choose any favorite cookies.
These Cookie Butter Cheesecake Cups are not only a delight to the taste buds but are also a breeze to assemble—perfect for anyone looking to indulge in a simple yet decadent dessert!
Step‑by‑Step Instructions for Cookie Butter Cheesecake Cups
Step 1: Prepare the Crust
In a medium bowl, combine the Biscoff cookie crumbs and melted butter, mixing until fully combined. The mixture should resemble wet sand; it’s perfect for your Cookie Butter Cheesecake Cups crust. Spoon about two tablespoons of this mixture into the bottom of each serving cup, pressing gently to create an even layer. Set aside to firm up as you prepare the filling.
Step 2: Whip the Cream
In a separate mixing bowl, pour in the heavy whipping cream. Using an electric mixer, whip the cream on medium speed until soft peaks form, which takes about 3-5 minutes. Keep an eye on it to prevent overwhipping; the cream should be fluffy and hold its shape. Once ready, gently set it aside while you make the cheesecake filling.
Step 3: Make the Cheesecake Filling
In a large mixing bowl, beat together the softened cream cheese, powdered sugar, cookie butter, and vanilla extract using an electric mixer on medium speed. Continue mixing until the mixture is rich and completely smooth, which typically takes around 2-3 minutes. This creamy mixture will be the star filling of your Cookie Butter Cheesecake Cups, so ensure there are no lumps!
Step 4: Fold in the Whipped Cream
Gently fold the whipped cream into the cookie butter mixture using a spatula. This step is crucial for achieving a light and airy mousse texture for your cheesecake filling. Take your time with this process—about a minute should suffice—making sure to retain as much of the airiness from the whipped cream as possible.
Step 5: Layer the Filling
Spoon the cheesecake filling over the crust layer in each cup. Aim to fill them about halfway full, allowing room for another layer. If desired, drizzle some melted cookie butter on top of the filling for an extra burst of flavor. This step will enhance the delicious design of your Cookie Butter Cheesecake Cups!
Step 6: Repeat the Layers
Carefully add another layer of the cookie crust on top of the cheesecake filling, followed by another generous layer of the cheesecake filling. The cups should be filled to about the brim at this stage. Finish each cup with a final swirl of melted cookie butter on top, creating a beautiful presentation.
Step 7: Garnish the Cups
For a lovely touch, sprinkle additional cookie crumbs or place whole cookies on top of each cup, making them visually enticing. This step not only adds charm but also hints at the deliciousness that awaits. Feel free to get creative with your garnishes!
Step 8: Chill Before Serving
Cover the cups with plastic wrap and chill them in the refrigerator for at least 1 hour to let the flavors meld together and the filling to firm up. This crucial step helps your Cookie Butter Cheesecake Cups set perfectly, ensuring a delightful experience when served. Enjoy them cold for the best taste!

Make Ahead Options
These Cookie Butter Cheesecake Cups are a fantastic treat for busy home cooks looking to save time during the week! You can prepare the crust and cheesecake filling up to 24 hours in advance; simply store each component separately in airtight containers in the refrigerator to maintain their freshness. When you’re ready to serve, layer the filling over the crust and garnish as desired. For longer storage, feel free to assemble the full cups without toppings, and they can even be frozen for up to 1 month. Just remember to refrigerate overnight after thawing to keep them just as delicious as when you first made them!
What to Serve with No-Bake Cookie Butter Cheesecake Cups
Looking for the perfect accompaniments to elevate these delicious dessert cups?
-
Fresh Berries: Juicy raspberries or strawberries add a refreshing burst, balancing the creamy richness of the cheesecake. Their tartness cuts through the sweetness beautifully.
-
Coffee or Espresso: Enjoy a warm cup of your favorite brew alongside the cheesecake cups. The robust flavors offer a comforting contrast while enhancing the dessert’s sweetness.
-
Caramel Drizzle: A rich, salted caramel sauce drizzled on top adds an indulgent sweetness along with a slight salty kick, complementing the cookie butter flavor perfectly.
-
Whipped Cream: A dollop of freshly whipped cream on top adds a light, airy texture that makes each spoonful even more delightful. It’s a classic pairing that never disappoints!
-
Chocolate Shavings: Fine chocolate curls or shavings sprinkled on top create an elegant touch. The deep cocoa flavor rounds out the sweetness and adds a sophisticated flair.
-
Mint Leaves: Fresh mint leaves provide a vibrant color and a refreshing note. This aromatic herb elevates the dish while adding a pop of color, perfect for presentation.
Serve these delightful accompaniments with your Cookie Butter Cheesecake Cups, and you’ll create an unforgettable dessert experience that leaves your guests raving!
Expert Tips for Cookie Butter Cheesecake Cups
-
Soften Cream Cheese: Make sure your cream cheese is at room temperature for smoother blending; cold cheese can lead to lumpy filling in your Cookie Butter Cheesecake Cups.
-
Whip Cautiously: When whipping cream, be careful not to overwhip. You want soft peaks for that perfect airy texture, which will help your filling stay fluffy.
-
Layer with Care: For the best presentation, use a piping bag to layer the cheesecake filling; it creates a beautiful swirl effect and prevents messy edges.
-
Chill Thoroughly: Allow your cups to chill for at least one hour before serving; this will ensure the filling sets nicely and enhances the flavors.
-
Make Ahead: These cups can be prepped a day in advance; just keep them covered in the fridge to save time on party day!
Cookie Butter Cheesecake Cups Variations
Feel free to customize your Cookie Butter Cheesecake Cups with these exciting twists that will elevate your dessert experience!
-
Peanut Butter: Swap cookie butter with creamy peanut butter for a nutty flavor that adds warmth and depth. This change brings a delightful twist to the familiar taste.
-
Chocolate Crust: Use crushed chocolate cookies instead of Biscoff for a rich, chocolaty base that pairs beautifully with the cheesecake filling. It’s a chocolate lover’s dream come true!
-
Dairy-Free Delight: Substitute cream cheese and heavy cream with non-dairy alternatives to make a vegan-friendly version that everyone can enjoy. Coconut cream works wonderfully for that creamy texture!
-
Spiced Pumpkin: Add pumpkin puree and a touch of cinnamon or nutmeg into the filling for a seasonal twist, especially fabulous during fall. This variation not only tastes great but also offers a festive flair!
-
Minty Freshness: Incorporate a few drops of peppermint extract in the filling for a refreshing minty taste that is perfect for holiday parties. Pair it with crushed chocolate cookies for a harmonious flavor blend.
-
Fruity Fusion: Top your cheesecake cups with a layer of fruit preserves or fresh berries for a pop of color and flavor. Berries provide a lovely contrast to the rich creaminess of the cheesecake.
-
Cookie Dough Swirl: Add a dollop of edible cookie dough into each layer for a surprise element that gives a fun, nostalgic vibe. It’s a treat that will take you back to your childhood!
-
Coffee Craze: Mix in a tablespoon of instant coffee granules into the filling for a mocha-inspired cheesecake that boosts flavor and energy. The coffee adds a lovely depth that pairs well with the sweetness.
These variations will inspire creativity and personalization for your Cookie Butter Cheesecake Cups—make them unique and share with your loved ones! For more delicious ideas, don’t miss my Garlic Butter Shrimp or try the warm goodness of Honey Butter Skillet Corn alongside your dessert!
How to Store and Freeze Cookie Butter Cheesecake Cups
Fridge: Keep the cheesecake cups in an airtight container in the refrigerator for up to 3 days. They’ll remain deliciously creamy, ready for any sweet craving!
Freezer: For longer storage, you can freeze the cups (without toppings) for up to 1 month. Make sure to wrap each cup tightly in plastic wrap before placing them in a freezer-safe container.
Thawing: To enjoy frozen Cookie Butter Cheesecake Cups, simply transfer them to the refrigerator one day before serving to thaw slowly.
Reheating: No need to reheat these cheesecake cups; they are best served chilled for the ultimate refreshing treat!

Cookie Butter Cheesecake Cups Recipe FAQs
What kind of cookies should I use for the crust?
I recommend using Biscoff or speculoos cookie crumbs for their sweet and crispy base. If you prefer a little twist, gingersnap crumbs work beautifully too! Be sure to crush them finely to create a cohesive crust that holds together well.
How long can I store Cookie Butter Cheesecake Cups in the fridge?
You can keep these delightful desserts in an airtight container in the refrigerator for up to 3 days. They’ll remain creamy and delicious, perfect for satisfying any sweet cravings that pop up during the week!
Can I freeze the Cookie Butter Cheesecake Cups?
Absolutely! To freeze, wrap each cup tightly in plastic wrap and place them in a freezer-safe container. They can be stored for up to 1 month. Just remember to thaw them in the refrigerator the day before serving for the best texture and flavor.
What should I do if my cheesecake filling is lumpy?
If your filling turns out lumpy, it’s often due to the cream cheese not being soft enough. Always make sure to bring your cream cheese to room temperature before mixing. If it’s too late for that, you can beat the filling again to try and smooth it out, or gently fold in more whipped cream—or even a splash of milk—if needed to achieve a smoother consistency.
Is this recipe suitable for people with nut allergies?
This recipe contains cookie butter, which typically has a nut base (depending on the brand). If you’re making this for someone with nut allergies, I recommend substituting the cookie butter with sunflower seed butter for a similar texture and flavor without the allergens. Always double-check ingredient labels to ensure safety!
Can I prepare Cookie Butter Cheesecake Cups a day in advance?
Yes, you can make them a day ahead! In fact, chilling them overnight can enhance the flavors as they meld together. Just cover them well with plastic wrap and store them in the refrigerator until you’re ready to serve. This makes preparing for gatherings a breeze!
Decadent Cookie Butter Cheesecake Cups That Wow Every Bite
Ingredients
Equipment
Method
- In a medium bowl, combine the Biscoff cookie crumbs and melted butter, mixing until fully combined. Spoon about two tablespoons into each serving cup, pressing gently to create an even layer.
- In a separate mixing bowl, whip the heavy whipping cream on medium speed until soft peaks form, about 3-5 minutes.
- In a large mixing bowl, beat together softened cream cheese, powdered sugar, cookie butter, and vanilla extract using an electric mixer until smooth.
- Gently fold the whipped cream into the cookie butter mixture using a spatula.
- Spoon the cheesecake filling over the crust layer in each cup, filling them about halfway.
- Carefully add another layer of cookie crust and then another layer of cheesecake filling. Finish with a swirl of melted cookie butter.
- Sprinkle additional cookie crumbs or place whole cookies on top of each cup to garnish.
- Cover the cups with plastic wrap and chill them in the refrigerator for at least 1 hour to set.
Leave a Reply